Class
Creating Classes
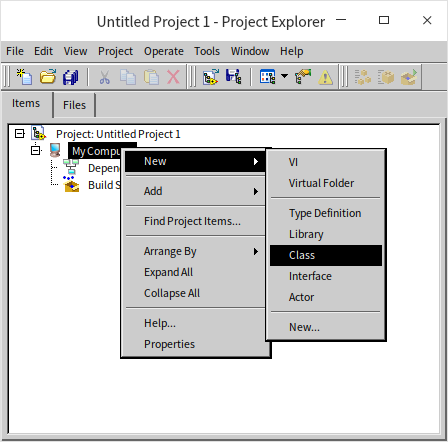
To initiate the creation of a new class within the Project Explorer, simply right-click and navigate to "New -> Class":
Let's name this class "Parent", since we intend to use it as the parent class for another class. During the creation process, LabVIEW prompts for the parent class from which the new class will inherit:
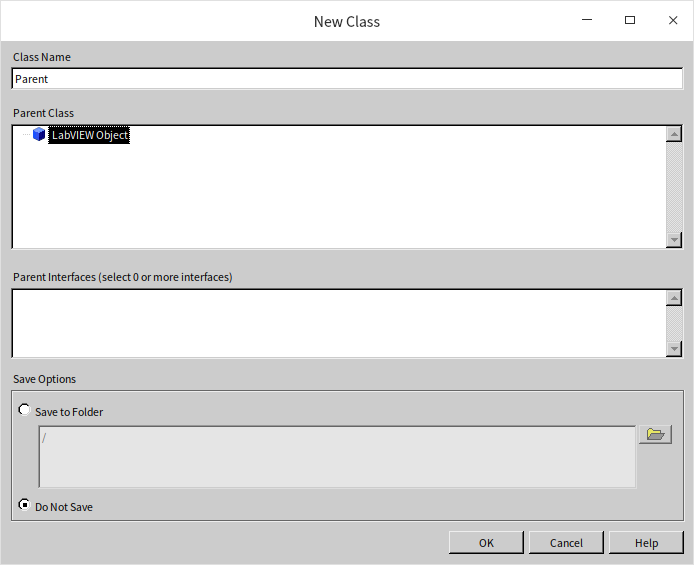
Since this is our first class creation endeavor, we don't have a specific parent class in mind for it. In LabVIEW, all classes must have one, and only one, parent class. If there's no need to specify a particular parent class, "LabVIEW Object" automatically becomes the default parent. Thus, "LabVIEW Object" acts as the ancestor class for all classes within LabVIEW. If you create a VI to process any LabVIEW object, such as retrieving an object's class name, you can use "LabVIEW Object" as the input data type. This flexibility allows your program to accept instances of any class type.
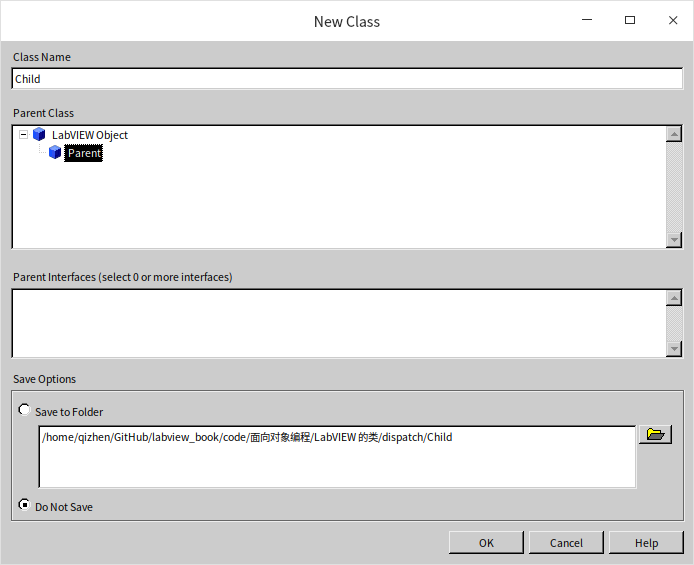
Following this, let's create another class named "Child" using the same procedure. This class will be a subclass of "Parent", so we'll select "Parent" as its parent class:
In terms of structure, a class is akin to a special LabVIEW Library, meaning many of its attributes and settings resemble those of a library. For instance, the class name also serves as a namespace, and you can set access permissions for the VIs within the class. Beyond these similarities, classes come with their unique configurations, including attributes and methods.
Classes are stored in files with an .lvclass extension.
Methods (VIs)
Creating methods for a class is as straightforward as right-clicking on the class and selecting the option to do so. At their core, methods are essentially VIs.
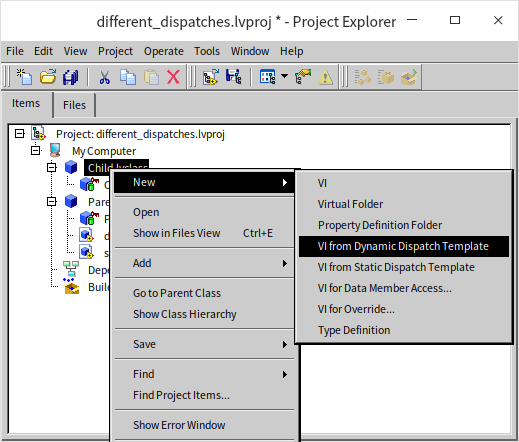
Within the "New" menu, several options are available:
- VI: This option is for creating a standard method VI.
- Virtual Folder: For organizational purposes, especially when a class contains numerous methods, these can be sorted into different folders.
- Property Definition Folder: This is a special folder reserved for VIs that handle data reading and writing operations.
- VI Based on Dynamic Dispatch Template: Use this template for methods in a class that might be overridden by similar methods in a subclass, akin to "virtual functions" in other programming languages.
- VI Based on Static Dispatch Template: Choose this for methods in a class that should not be overridden by subclasses. The sole difference from the dynamic dispatch VI is in how the class input/output terminals are allocated: dynamically for dynamic dispatch and statically for static dispatch.
- VIs for Data Member Access: Because class data is private, public VIs are necessary for accessing these data. This shortcut creates VIs for reading and writing class data, essentially dynamic or static dispatch VIs, but with added data manipulation code in the block diagram.
- VIs for Overriding: Specifically for subclasses, this option is for creating VIs that override methods from the parent class. It produces a VI based on the dynamic dispatch template, with pre-added code for invoking the parent class's method of the same name.
- Type Definition: This allows for the creation of custom controls for custom data types that might be utilized within the module.
Next, we'll delve into the distinct behaviors of "VI Based on Dynamic Dispatch Template" and "VI Based on Static Dispatch Template".
Begin by creating a VI in the Parent class based on the static dispatch template, named static.vi. The purpose of this VI is simple: it merely returns the string “Parent Static VI”.
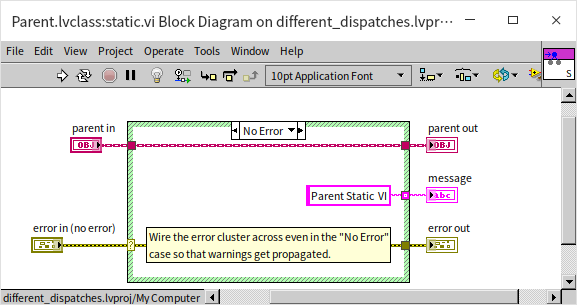
Subsequently, we tried creating a statically dispatched VI with the same name in the Child class. It turns out that the newly created Child.lvclass:static.vi is unable to execute.
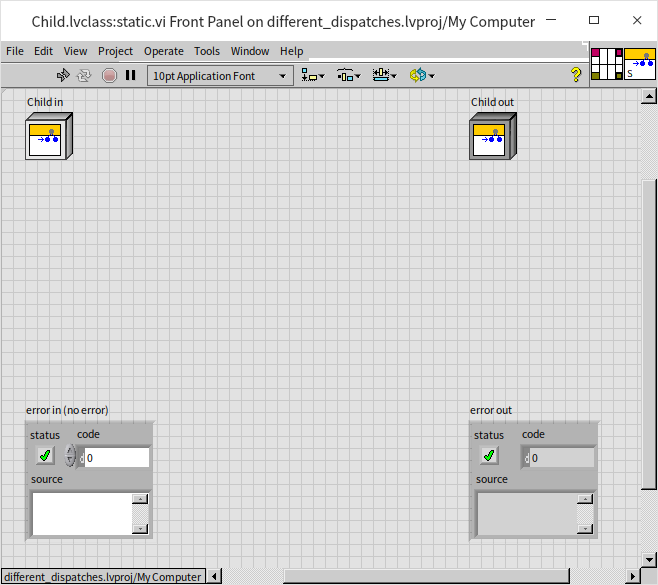
Triggering its run button reveals an error message indicating it attempts to override a statically dispatched VI from an ancestor class.
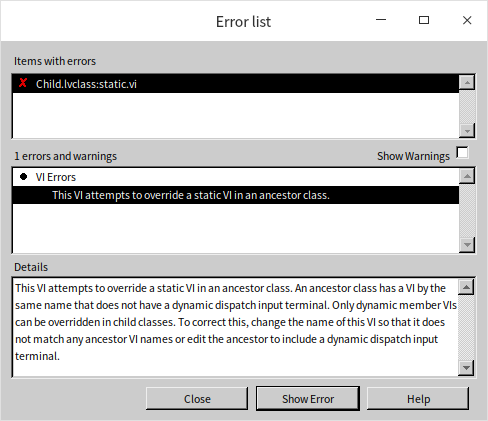
If a class already possesses a statically dispatched VI, its descendants cannot have a method with the same name.
When creating two dynamically dispatched VIs, it's possible to have VIs with identical names in both the parent and child classes, based on the dynamic dispatch template. The primary difference lies in their output text; nonetheless, both VIs function as expected:
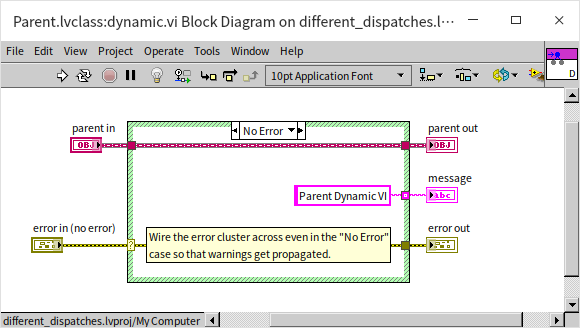
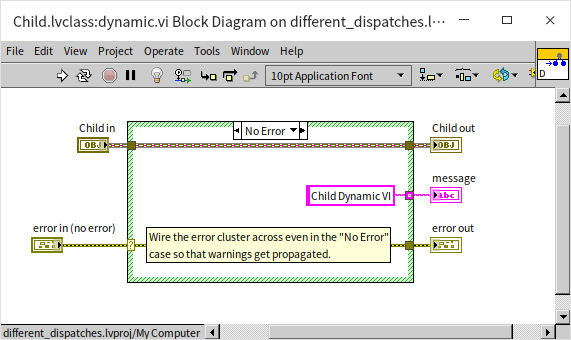
Now, let's conduct a test program to explore the results these VIs yield. The following diagram illustrates a straightforward test featuring instances of both the parent and child classes, which are subsequently passed to the previously created VIs to examine the results:
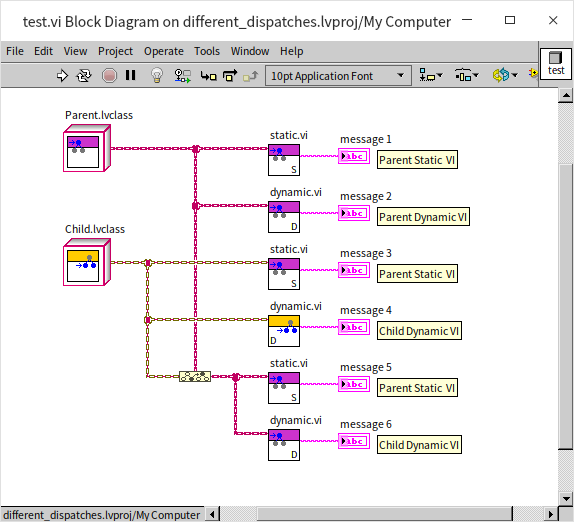
In this diagram, VIs with a purplish icon are associated with the Parent class, whereas those with a yellowish icon pertain to the Child class.
Given that static.vi is based on a static dispatch template and cannot be overridden by descendants, it's guaranteed that the static.vi from the Parent class will always be invoked, consistently returning "Parent Static VI", irrespective of the input type.
An instance of the Parent class invoking Parent.lvclass:dynamic.vi yields "Parent Dynamic VI", whereas an instance of the Child class invoking Child.lvclass:dynamic.vi produces "Child Dynamic VI". These outcomes are quite predictable.
The last test, "message 6", is particularly noteworthy. Since the Child class is derived from the Parent class, it can be viewed as a subset of the Parent. Therefore, an object from the Child class inherently belongs to the Parent class as well. In the program, this allows for the conversion of the Child class object's data type to that of the Parent class, enabling it to call dynamic.vi. Despite being represented by an ancestor class's data type in the program, the instance remains fundamentally a Child class instance. Hence, when dynamic.vi is invoked, it's specifically the version from the Child class that executes. This is evident as the returned text is "Child Dynamic VI". The program only resorts to invoking the parent class's same-named VI when the child class has not implemented (or overridden) the dynamically dispatched VI.
Next, we adjusted the program logic within Parent.lvclass:static.vi to call Parent.lvclass:dynamic.vi:
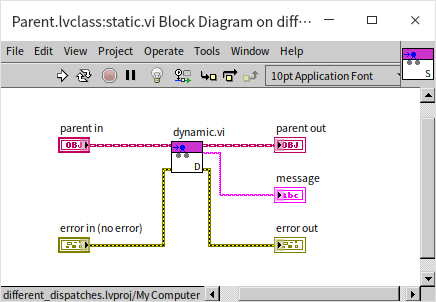
Following this modification, our test program uses an instance of the Child class, generalized as a Parent class type, to invoke Parent.lvclass:static.vi. What would be the return value?
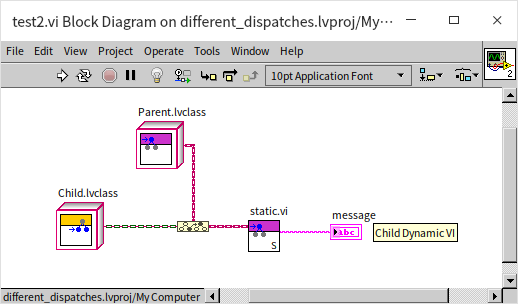
Even though the Child subclass lacks static.vi, and the test confirms the invocation of the static.vi from the parent class, since the instance passed in belongs to the Child class, the parent's static.vi still ends up calling the dynamic.vi within the Child class. A dynamically dispatched VI, even when invoked from a VI in another class, executes the method corresponding to the instance's actual class.
This scenario illustrates the principle of "polymorphism" in object-oriented programming. When writing code, we can place parent class methods within it. However, at runtime, the specific method invoked is determined by the type of the instance passed in. If the object is an instance of a particular subclass, the subclass's method will be called. In essence, the parent class's called method is abstract, displaying various behaviors depending on the actual type of the object passed in, thus demonstrating polymorphism.
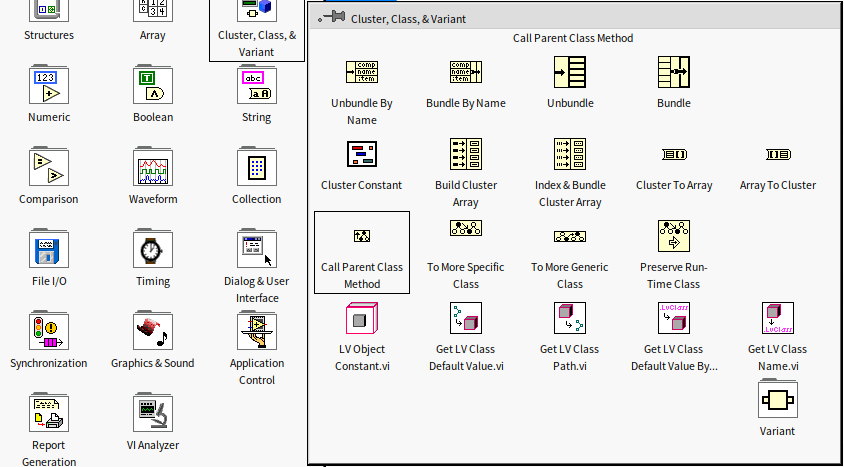
What happens if a parent class's VI is overridden by a subclass, can it no longer be invoked within that subclass? To call a method of the same name from the parent class within a subclass, directly dragging the parent class's method, as you would with a regular sub VI, does not work. This method of invocation is ineffective; instead, the "Call Parent Method" node from the "Programming -> Cluster, Class & Variant" section of the function palette must be used. Selecting "VI for Overriding" when creating a method for a class automatically incorporates this node into the block diagram of the newly generated VI.
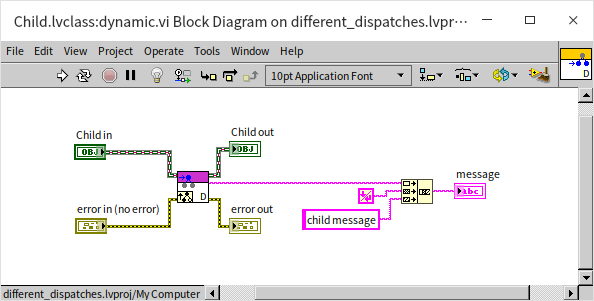
The method VI depicted below uses the Call Parent Method node to obtain data returned by the same-named method of the parent class, then merges this data with its own before returning:
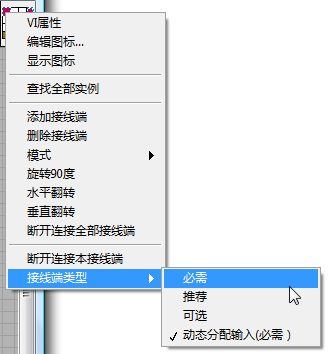
The sole distinction at the source code level between statically and dynamically dispatched VIs is that dynamically dispatched VIs have dynamically allocated class input/output terminals, while statically dispatched VIs do not. If a statically dispatched VI is initially created but later determined to be more suited as a dynamically dispatched VI, there's no need to craft a new VI from scratch. Simply altering the existing VI's terminal types will do.
Properties (Data)
Every class includes a .ctl item that shares the class's name. While its panel and setup resemble custom controls, this .ctl file itself is not actually present on the disk. Its data are directly incorporated into the .lvclass file bearing the same name. Moreover, this .ctl item must be configured as a cluster, which contains the class's properties - essentially all the data utilized by the class, akin to a class's variables in other programming languages. Unique to LabVIEW, class data are exclusively private, a design choice made primarily for security reasons. Access to these data from outside the class is only possible through public methods.
The private nature of data eliminates the concern of inheritance; that is, subclasses do not inherit the data from their parent class. Should a subclass require data from the parent class, it must access them indirectly via methods provided by the parent.
Let's introduce some data to the class we've just created:
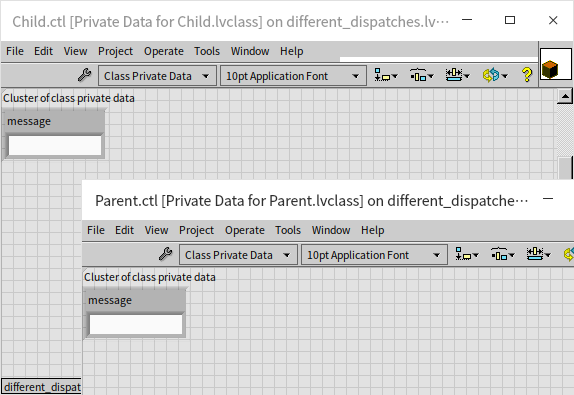
It's permissible for subclasses and parent classes to have data elements named identically. Class data can be initialized with default values, which correspond to the default values of the related controls. For instance, in the image above, if the default value for the message control is an empty string, then the message data in newly created instances will also be an empty string. Changing the message control's default value to "init" means that new instances will have "init" as their message data.
We can create some VIs for data reading and writing using the class's "New -> VI for Data Member Access" menu option.
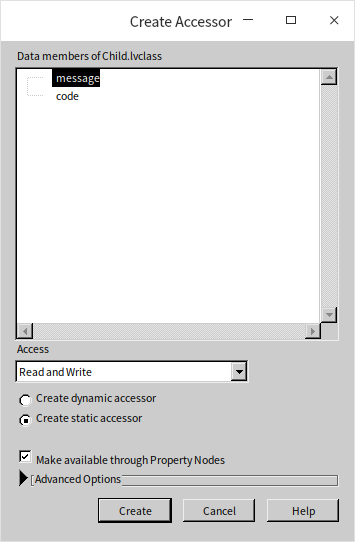
The choice between dynamic or static dispatch is available for newly created data access VIs. Given that the data are private, with no inheritance concerns, opting for static data member access VIs tends to be more intuitive. The complication arises when parent and child classes contain data with the same names, leading to data member access VIs also sharing names. In such static scenarios, we encounter the previously mentioned error about trying to override a statically dispatched VI from an ancestor class. Renaming the data access VI offers a workaround, as the VI name does not need to match the data name exactly.
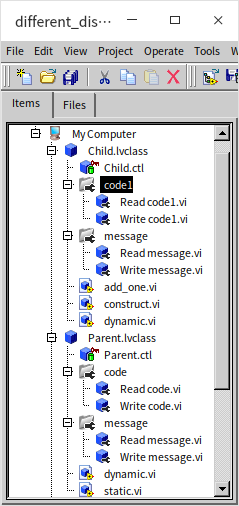
Alternatively, creating dynamically dispatched data member access VIs allows for name duplication across parent and child classes. This approach also simplifies understanding how subclass accesses data from the parent class. Despite LabVIEW data not being inheritable, real-world scenarios sometimes necessitate data inheritance, such as when a "Furniture" parent class with a "Price" attribute has a "Table" subclass that should logically inherit "Furniture's" price. In these instances, adding identically named data in both parent and subclass and generating dynamically dispatched data member access VIs with matching names makes it easier to call the parent’s data member access VI from the subclass, thereby accessing the parent's data.
Below is an illustration of some data member access VIs we've created for our test project:
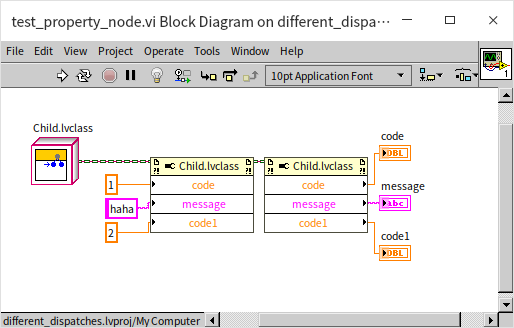
Data member access VIs within classes can also be called via LabVIEW's property nodes, allowing for the simultaneous reading and writing of multiple properties:
When designing classes, it's recommended to limit direct user access to data member access VIs. A key principle in module design is to obscure the underlying data from users as much as possible, requiring them to interact through the module's provided high-level methods. This approach ensures that module developers can confidently maintain and enhance the module's foundation and data.
Wire Style
In LabVIEW, each newly created class initially uses the same style and color for its wires by default. To distinguish more clearly between the data transmitted by wires of different classes in demonstration programs, each class is assigned its own unique wire color and style:
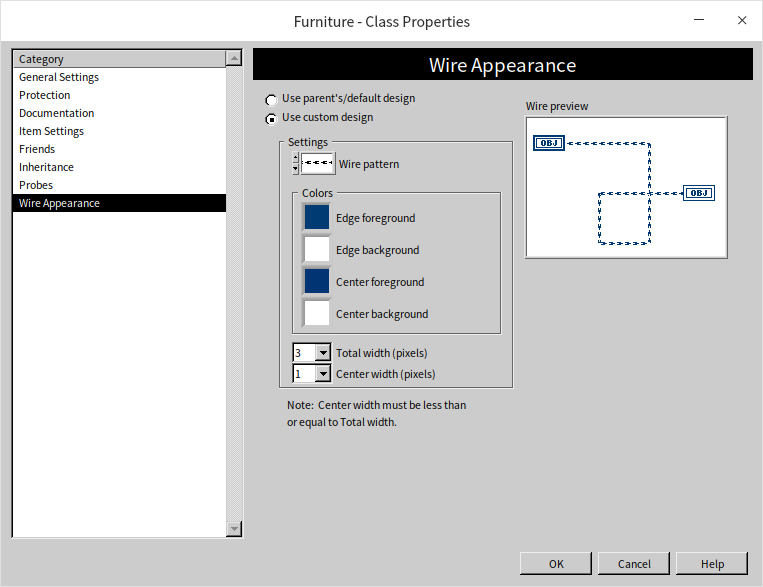
Application Example
Now, let’s explore an example that mirrors a real-life scenario to illustrate the workflow of object-oriented programming.
Scenario
Imagine there's a furniture store that specializes in selling just two types of furniture: tables and chairs. We aim to develop a program that simulates the properties and methods associated with these furniture pieces within the store. The simulation will cover the following attributes and methods:
- ID (Attribute): Each furniture item is assigned a unique identifier.
- Cost Price (Attribute): The acquisition price for the store.
- Calculate Selling Price (Method): Each furniture item has a predetermined selling price, calculated as
Cost Price * (Expected Profit Margin + 1) * (Tax Rate + 1). It's assumed that the cost price, profit margin, and tax rate are known variables. - Assembly (Method): Details the assembly process for both tables and chairs.
- For Tables: The assembly involves attaching the legs to the tabletop and then flipping it upright. This process can be succinctly described in the demonstration program.
- For Chairs: The process includes fastening the cushion to the backrest and then attaching the legs. Similarly, this can be described in the demonstration program.
- Besides these shared attributes and methods, each class is also expected to offer a unique method:
- Setting a Tablecloth (Table Class’s Unique Method): The demonstration program will indicate that the tablecloth has been set using a brief text description.
- Placing a Cushion (Chair Class’s Unique Method): The program will use text to show that the cushion has been positioned correctly.
Additionally, we’ll craft a simulation program that calls upon each furniture item in the store, outputting their selling prices and load capacity.
Design
Based on the specified requirements, we outline the following design:
- We require three classes: Furniture, Table, and Chair, with both Table and Chair inheriting from the Furniture class.
- The Furniture class encompasses two pieces of data: ID and cost price, alongside two methods: Return Selling Price and Assembly. These attributes and methods are shared by both the Table and Chair classes.
- The method for Returning Selling Price maintains identical logic across all classes, necessitating implementation solely within the parent Furniture class. This eliminates the need for reimplementation within the subclasses; they can simply inherit this method.
- Although the Assembly method is present in both the Table and Chair classes, its execution differs between the two, requiring individual implementations within each subclass.
- Additionally, we plan to implement an "Initialize" method in both the Table and Chair classes. Despite sharing the same name, these methods are distinct due to their differing input parameters and, therefore, cannot be defined within the parent class.
- The Table class will feature four methods: Initialize (to set product ID, cost price, and tablecloth type), Return Selling Price, Assembly, and Spread Tablecloth.
- Similarly, the Chair class will include four methods: Initialize (to set product ID, cost price, and cushion model), Return Selling Price, Assembly, and Place Cushion.
- Two constants are also essential: the profit margin and tax rate.
Creating Classes
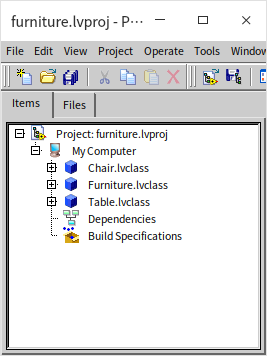
As previously introduced, begin by creating a new project and then establish three classes: Furniture, Table, and Chair, with the latter two inheriting from Furniture.
Properties (Data)
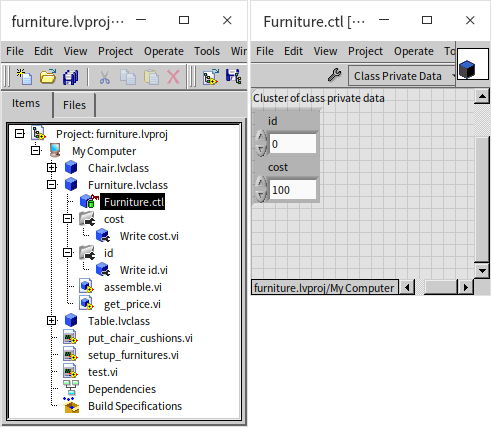
The Furniture class houses two data elements: ID and cost. To facilitate the setting of these data points during the initialization of tables and chairs, we have introduced data access VIs for them.
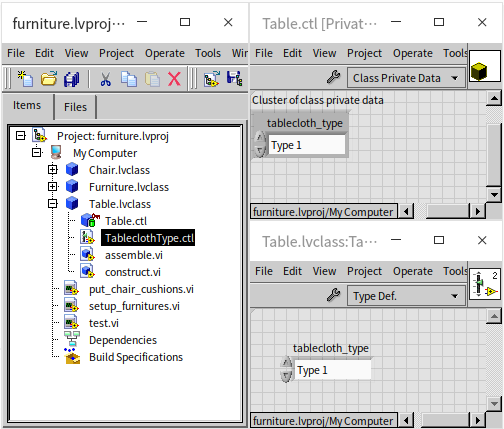
The Table and Chair classes each require data storage for the tablecloth type and cushion model, respectively. It is recommended to define custom data types for these pieces of information. Custom data types can also be stored within the class itself. As illustrated below, the tablecloth type data for the Table class is kept within the class.
Methods (VIs)
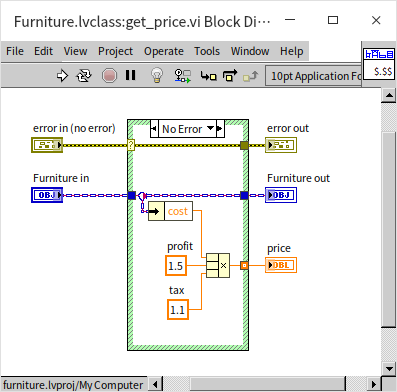
Let's start by implementing the methods in the parent Furniture class. The Return Selling Price (get_price.vi) method is designed to be called directly by the subclasses without needing any modifications, thus it utilizes a statically dispatched VI. Its primary function is to calculate the furniture's selling price by multiplying the cost price by both profit and tax parameters:
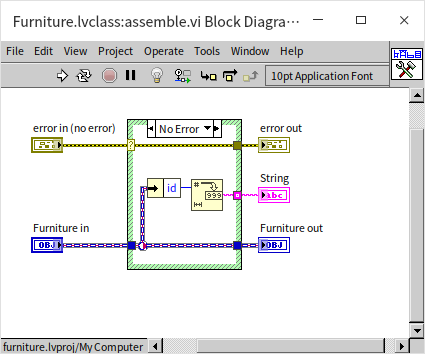
The Assembly (assemble) method in the Furniture class is intended to be customized by the subclasses, which requires it to be a dynamically dispatched VI. In its default form within the parent class, this method simply returns the furniture's ID:
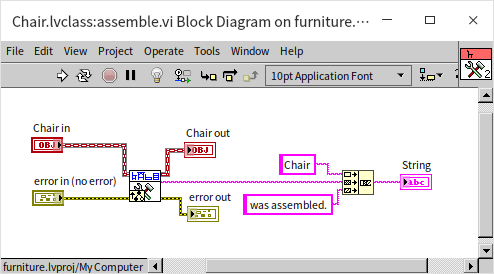
Subclasses, such as the Chair class, override the Assembly method. As shown below, the Chair class’s version of the Assembly method first invokes the parent class's corresponding method to retrieve the furniture's ID, then appends a "Chair" descriptor to the output. This approach ensures clear indication of the method's invocation. The Table class follows a similar approach for its Assembly method implementation, which is not depicted here.
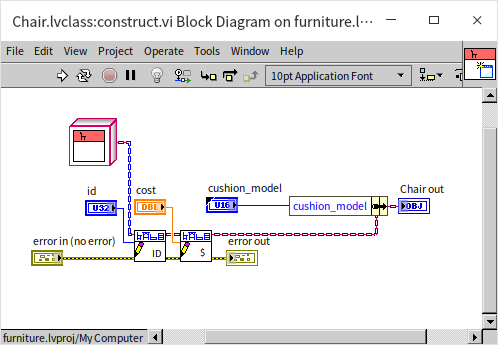
Additionally, the Chair class features a constructor method (construct.vi) for initializing chair-specific data. This method begins by invoking Furniture class's data access VIs to set the product ID and cost, and then it records the cushion model into the Chair class's data. The Table class has a parallel constructor method.
A distinctive method in the Chair class involves Placing the Cushion (put_cushion.vi). This function retrieves the cushion model and returns a message indicating that the cushion has been correctly placed. The Table class's method for Spreading the Tablecloth (put_tablecloth.vi) operates similarly.
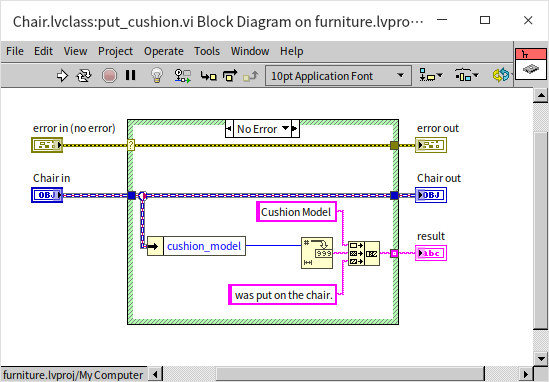
Thus, we've successfully implemented all the necessary classes for the furniture store application. The next step is to test them to confirm they function as intended.
Application Testing
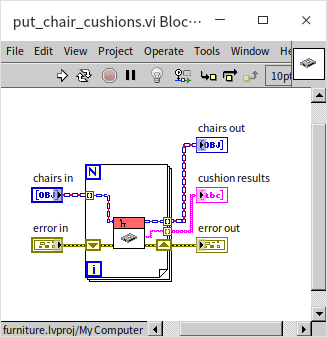
First off, we've developed a simple VI called put_chair_cushions.vi to showcase placing cushions on a series of chairs. This VI operates in a straightforward manner: it accepts an array of instances from the Chair class and invokes the Place Cushion method on each:
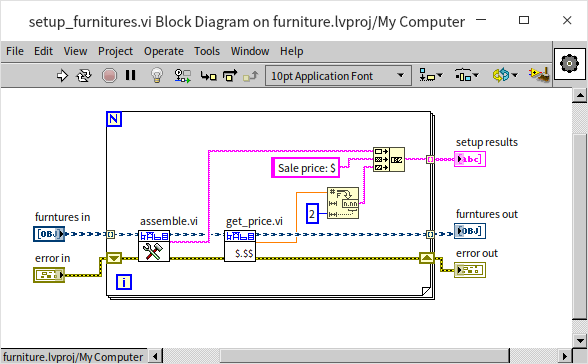
Following this, we craft another VI, setup_furnitures.vi, tasked with assembling all types of furniture. Given its role in handling various furniture types, its input and output widgets are generalized to the Furniture type rather than being specific to either Tables or Chairs. This VI is a tad more complex; it sequentially invokes the "Assemble" method and the "Return Selling Price" method for each furniture piece, subsequently merging the strings returned from both methods:
Now, we're ready to proceed with the test program:
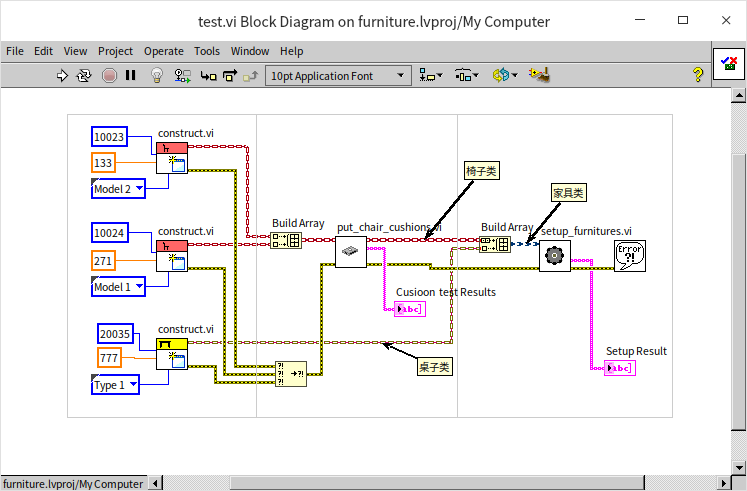
This test program is essentially divided into three segments:
- The far-left section deals with initialization, leveraging the constructor methods of the Table and Chair classes to generate two chairs and one table.
- The central section places the chair objects into an array, which is then fed to put_chair_cushions.vi for cushion placement.
- The rightmost section combines two chairs and a table into a single array. This array's data type automatically adjusts to an array of the Furniture class to accommodate both chairs and tables.
Executing this test VI produces the following outcomes:
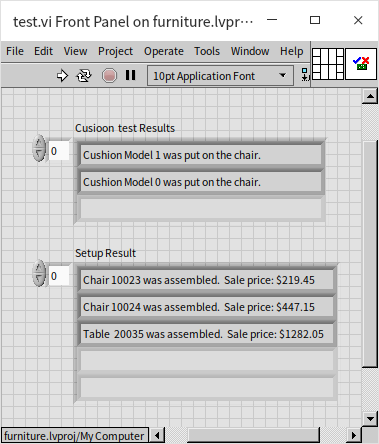
Traditionally, handling different input objects to invoke corresponding sub VIs would necessitate a conditional structure for identifying the object's type. However, thanks to the polymorphic nature of classes, the application (test program) sidesteps the need for manually discerning the subclass of instance data or invoking varied sub VIs. All instances can seamlessly be passed using their shared parent class type, employing only the parent class's methods within the code. When the program reaches a parent class method, it automatically triggers the respective subclass's overridden method.
In our scenario, both the Table and Chair classes inherit and subsequently override the "Assemble" method from the Furniture class, showcasing polymorphism. Despite setup_furnitures.vi's input being of the Furniture class, the program deftly determines the specific types of input objects when executing the assemble.vi method, thus enabling the test results to indicate "Table" for Table class objects and "Chair" for Chair class objects.
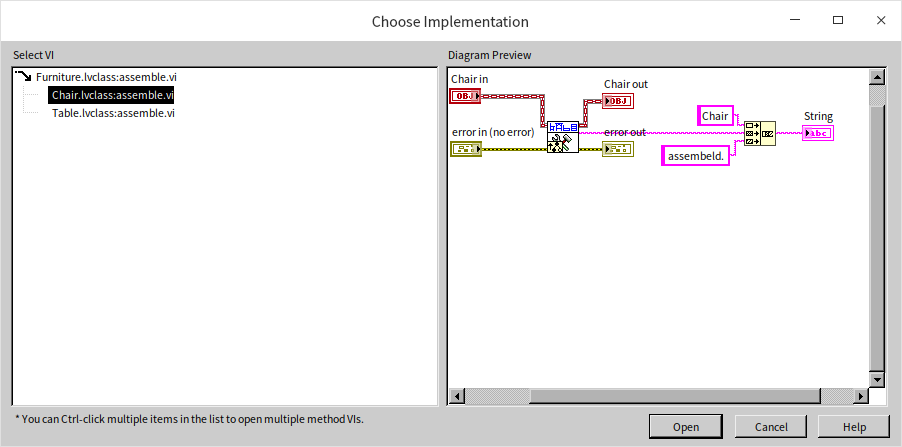
When double-clicking the assemble.vi call within the program, LabVIEW does not directly open the sub VI as usual but instead displays a list of all similarly named VIs across classes, prompting the user to select which one they wish to examine.
