Error Handling
Ensuring stability and security in the programs we develop is crucial. Upcoming chapters will delve into strategies for avoiding potential errors in your LabVIEW programs. However, even with meticulous design, unforeseen oversights or latent issues can arise during programming. Under certain conditions, these issues may lead to program errors. Thus, beyond striving for thoroughness and minimizing errors, it's essential to implement proactive measures within our programs. These measures, known as error handling mechanisms, help mitigate the impact of errors and enable developers to swiftly locate and address them.
A key concept we previously touched upon is the common use of Boolean-type case structures, particularly for managing error wires. This approach is a fundamental and widely applied error handling mechanism. Its ubiquity extends to most lower-level sub-VIs in LabVIEW, highlighting the necessity of a thorough understanding of this topic.
The term "errors" here refers to issues that arise during a program's runtime. Implementing an error handling mechanism serves two primary purposes: firstly, it enables the early detection and reporting of errors, providing details on the location and conditions under which they occur. This information is invaluable for debugging and correcting issues. Secondly, it aims to reduce the secondary effects of errors, ensuring that programming faults do not lead users to receive incorrect results.
Consider, for example, the implications of a suboptimal error handling approach: imagine a hardware testing program that encounters an anomaly during the initialization of its data acquisition device. If the program overlooks this error and continues operating, it might falsely indicate that all products meet the required standards. In reality, this could be due to the hardware's inability to detect signals from faulty products, potentially resulting in defective products being erroneously approved. Such scenarios underscore the importance of effective error handling in programming.
The Default Error Handling
In LabVIEW, when an error occurs within a function or VI without a connected error wire, the program triggers its default error handling process. This typically results in the program pausing, LabVIEW highlighting the problematic function or sub-VI, and a dialog box appearing with error details. Consider the example shown below: the "Open File" function's error output isn't wired to any terminal. If it tries to open a nonexistent file, LabVIEW will promptly display an error message:
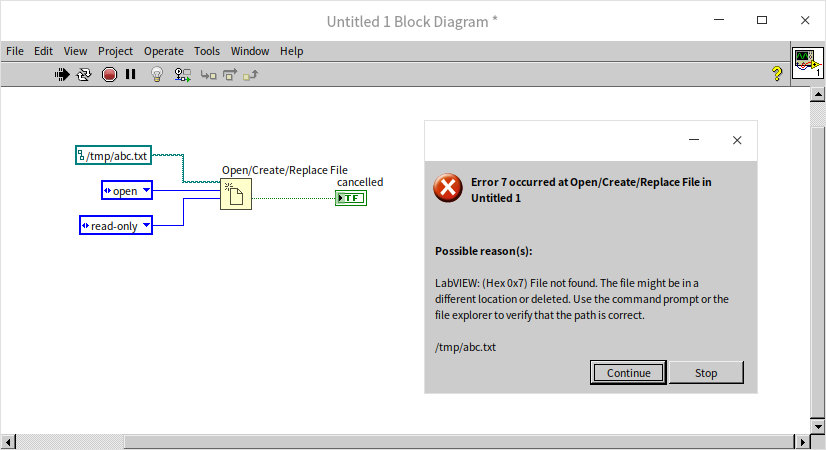
This dialog box offers two choices: "Continue" and "Stop". Selecting "Continue" prompts LabVIEW to overlook the error and proceed, while "Stop" terminates program execution.
here are instances where LabVIEW's automatic error handling can be inconvenient. Some errors, being minor or inconsequential, don't necessarily warrant intervention. However, the pop-up dialog box requires user action, which can disrupt user-facing applications, especially when frequent error messages intrude. The good news is, you can disable this automatic feature in the VI properties dialog:
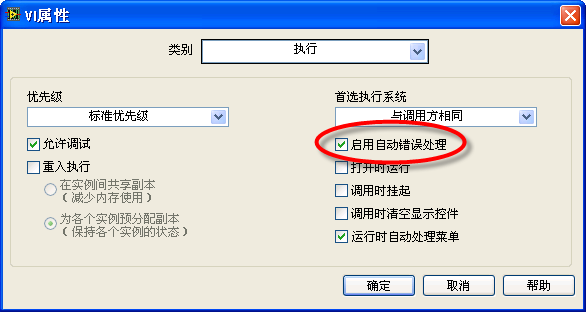
To turn off LabVIEW's default error handling across all VIs, adjust the settings in LabVIEW's Options Dialog Box. In the "Block Diagram" section of this dialog box, you'll find the "Error Handling" category where you can disable the default error handling mechanism:
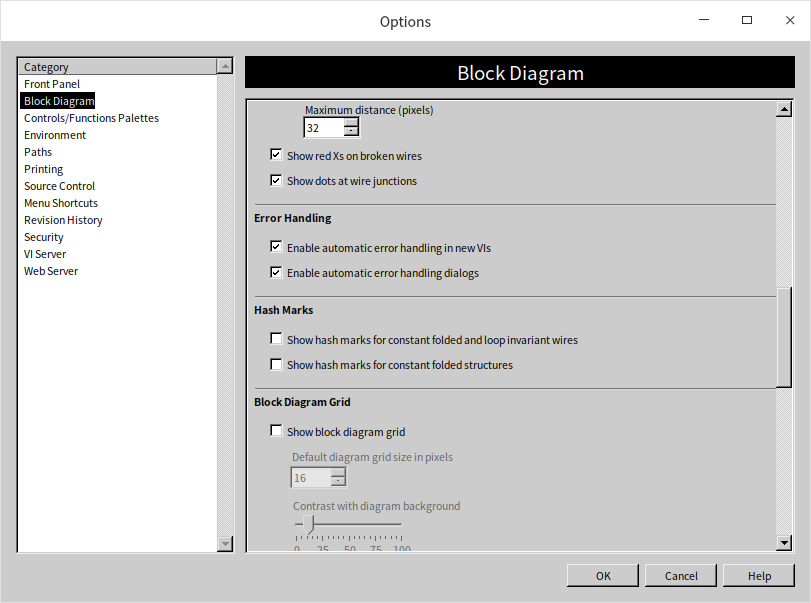
By customizing these settings, you can tailor LabVIEW's error handling to better fit your application's needs, balancing between user experience and the necessity of error notifications.
Error Clusters
LabVIEW incorporates error input and output clusters in many of its functions and VIs, each typically containing a Boolean (indicating the presence of an error when true), a numeric (representing the error code), and a string (providing the error message):
When a function or VI that uses these error clusters encounters an error during its operation, it outputs data in the form of an error cluster. For example, let's look at the following scenario:
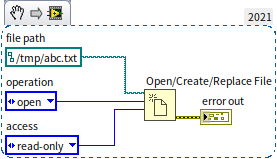
In this instance, the program attempts to open a file that doesn't exist using the "Open File" function. Consequently, the error cluster associated with this function flags an error. (The topic of file operations will be explored in depth in the File Reading and Writing section.) To gain more insight into the nature of the error, you can access an explanation by selecting "Explain Error" from either the VI's "Help" menu or the right-click menu of the error cluster control. This action brings up a dialog box detailing where and why the error occurred. In our example, the "Explain Error" dialog indicates that "the file was not found, and it might be located in another path...":
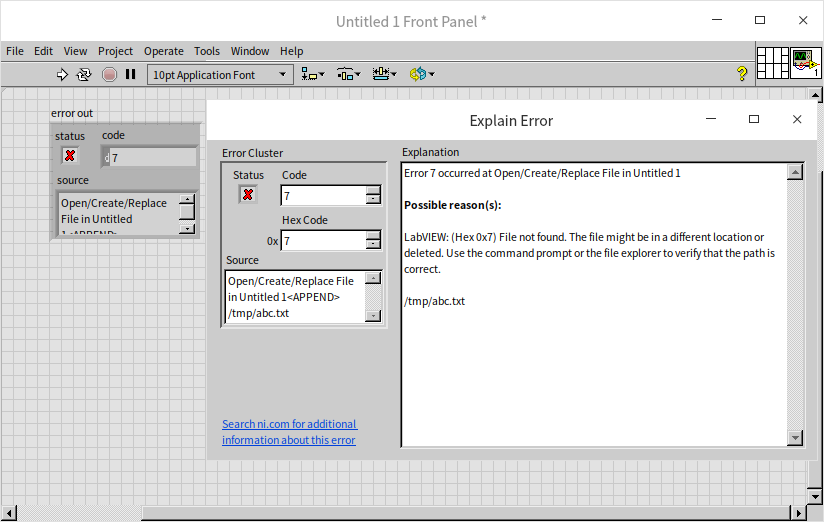
Errors in LabVIEW can be of two types: those that are predictable and those that are not. Each type requires a different strategy for handling, emphasizing the importance of understanding and effectively utilizing error clusters in your LabVIEW programs.
Handling Unpredictable Errors
Unpredictable errors, also known as "exceptions", are those that a programmer hasn't foreseen, occurring under unusual circumstances in a function or VI. These errors, often unexpected, can cause a program to deviate from its intended path, rendering further operation meaningless or, worse, harmful. Such errors can lead to serious issues like data corruption, resource waste, or misleading users about the program's accuracy.
A common strategy to manage these errors is to immediately cease further code execution upon detection of an error, effectively halting the program and alerting the user to the issue. This is typically done by integrating a conditional structure at critical points in the program. The error output from a function is connected to this structure's selector, and the remaining code is placed within the "no error" branch. Thus, if an error is detected, the subsequent sections of the program are bypassed. For instance, in the program below, file reading is skipped if an error occurs during file opening:
Implementing a conditional structure after every function, however, is impractical for large-scale programs. Not all errors require an immediate cessation of the entire program. Some sections of code are robust enough to not cause significant harm or delay even when an error is present and can therefore be executed before the program exits. In practical programming, rather than adding an error handling structure for each function's error output, it's more efficient to manage error assessment in lower-level sub-VIs. In such a setup, each sub-VI initially checks its "error input" parameter. If an error is present, indicating an exception, the sub-VI skips its main code and passes the error down the line. Subsequent sub-VIs will also bypass their primary functions, continuing this pattern until the program concludes. This error handling structure is illustrated in the following images:
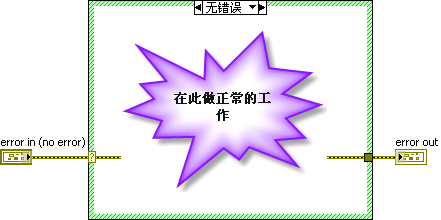
Sub-VIs employing this error handling approach are widespread in LabVIEW, and conveniently, LabVIEW offers templates for such VIs. To create a sub-VI with built-in error handling, navigate to "File -> New" in the menu, and then select the "Sub-VI with Error Handling" template from the dialog box:
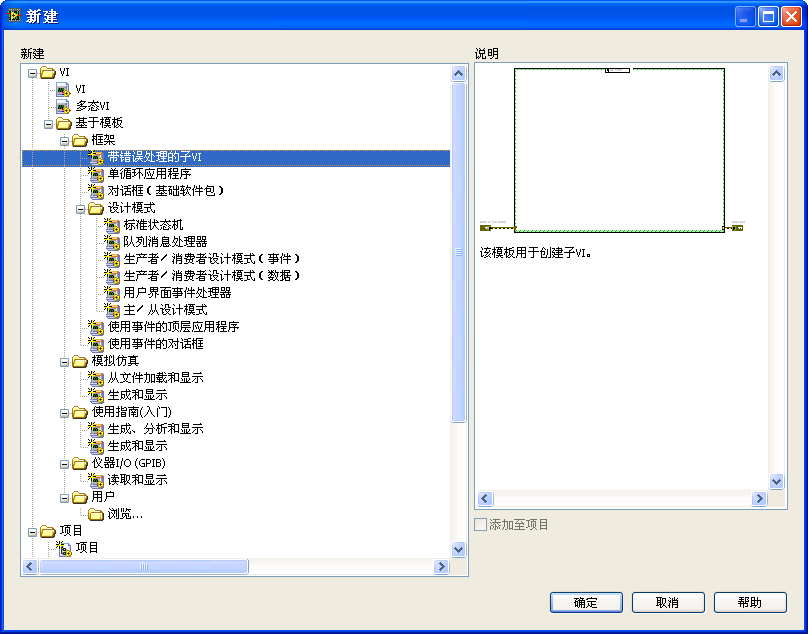
While this template simplifies the process, its utility is somewhat limited due to its basic nature. Often, manually creating a conditional structure might be just as efficient. I frequently opt to construct these VIs manually for greater control and customization.
In cases where every function and sub-VI within a VI already include error input and output parameters, the overarching VI typically doesn't need an additional conditional structure for error checking. The error input can simply be passed down for handling by the lower-level functions and sub-VIs. Take, for example, the VI illustrated below:
Since all the functions in this VI are already equipped with their own error handling mechanisms, there's no need for an extra layer of error handling. If an error occurs in "Open File", for instance, "Read Text File" will bypass its operation. It's worth noting that most of LabVIEW's built-in functions and VIs come with these error handling capabilities, especially those with an error output terminal.
Certain program codes are essential and must execute regardless of errors. This is particularly true for operations that involve opening resources like files or references, which need to be closed before the program exits to prevent issues like memory leaks. In the previously mentioned program, a file is opened and then read. Even if errors arise during reading – such as exceeding a predetermined file length – the closing operation must still occur to ensure all opened resources are properly shut down.
That said, users don't need to add special handling for functions like "Close File". This function is designed to close the input file ("reference handle") regardless of the error input it receives. However, when developing your error handling mechanisms, it's crucial to identify and ensure that such critical pieces of code are executed even in the event of errors.
Handling Expected Errors
Expected errors are those that a programmer anticipates might be returned by a function or VI under specific conditions. For instance, consider the following program:
In this scenario, when the program reaches the "Open/Create/Replace File" function, it prompts the user to select a file. However, the user might opt not to choose any file and instead press the "Cancel" button. This action would trigger the "Open/Create/Replace File" VI to return an error with code 43.
The response of the file opening function to the "Cancel" action could be improved. Recognizing that hitting "Cancel" is a legitimate user action, programmers should anticipate the possibility of encountering error code 43. The goal should be to manage this error in a way that prevents it from leading to an abnormal exit of the program. This calls for special handling of such expected errors.
In the example shown, the branching structure is designed to address the scenario when a user clicks "Cancel". In this case, the program bypasses file reading and closing operations. It also checks if the error code is 43 and, if so, disregards the error, avoiding disruption to subsequent processes (assuming this is part of a sub-VI). This handling strategy in the "no error" branch is similar to conventional error handling approaches:
LabVIEW provides various functions and sub-VIs for managing error data. For example, the "Clear Errors.vi" can be utilized to eliminate specific or all errors. Therefore, the process described above can be streamlined as shown in this program:

You can find LabVIEW's error handling functions and VIs in the "Programming -> Dialog & User Interface" section of the function palette, providing accessible solutions for managing common error scenarios.
Implementing Custom Errors in LabVIEW
While we've covered handling errors from LabVIEW's standard functions or VIs, you can also create and return custom errors specific to your application's requirements.
To generate a custom error from your VI, you simply need to define an error output cluster. A more robust approach is to use the "Error Code to Error Cluster" VI located under "Programming -> Dialog & User Interface". By feeding this VI with your specific error code and message, it generates the corresponding error cluster:
You can use an existing LabVIEW error code, such as error code 50 ("Value out of range"), which may occur when an input exceeds acceptable limits. Alternatively, you can use a number between 5000 and 9999 or between -8999 and -8000, as LabVIEW reserves these ranges for user-defined error codes.
To find out what a particular LabVIEW error code means, consult the LabVIEW help documentation or use "Help -> Explain Error". Entering an error code into the Explain Error dialog will reveal its associated error message.
Creating and managing custom error codes and messages within a program can be cumbersome, especially for a large number of user-defined errors. If your project demands an extensive list of custom error codes, consider storing all your user-defined error codes and messages in a text file. LabVIEW includes an error code editor specifically designed for this purpose. Access this tool via "Tools -> Advanced -> Edit Error Codes":
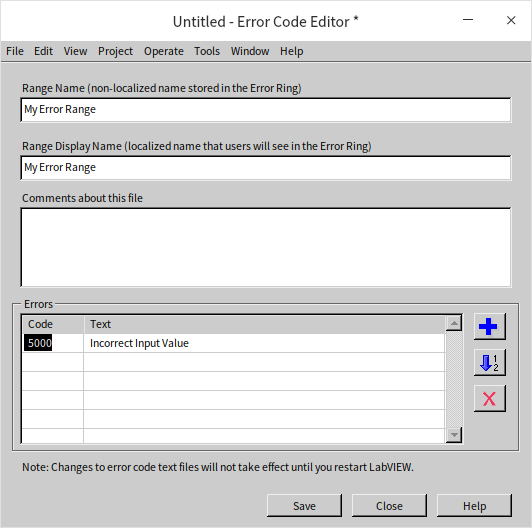
In this tool, input all your custom error codes and messages, then save them to the default directory, typically found at [LabVIEW]\user.lib\errors\:
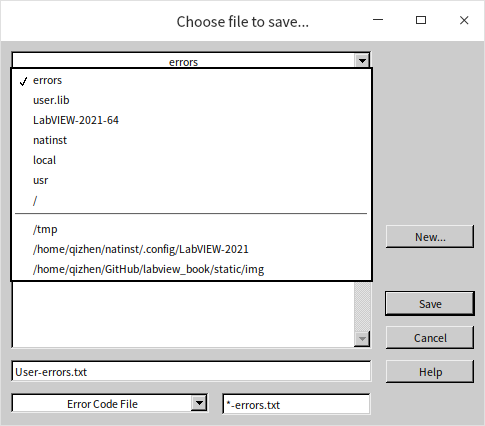
Once you restart LabVIEW, it loads your custom error codes and messages into its system, allowing you to use them in your programs just as you would the standard system error codes. This functionality provides a streamlined way to handle unique error conditions specific to your LabVIEW applications.
Showcasing Error Messages
There are times when you might want to avoid pop-up error dialogs, and other times when displaying these errors is crucial, regardless of the VI's property settings. Normally, it's best to avoid error dialogs during a program's runtime. However, if errors occur, particularly unexpected ones, as the program concludes, it's essential to inform the user.
LabVIEW offers two dedicated sub-VIs for handling such scenarios: the "Simple Error Handler.vi" and the "General Error Handler.vi". The Simple Error Handler provides a selection of basic error management options if the input error cluster indicates an issue. These options range from a simple single-button dialog to a dialog with a "stop program" button for user interaction. For most applications, the Simple Error Handler suffices. If you need more advanced features, like filtering specific errors or adding detailed information to user-defined errors, you can opt for the General Error Handler.
The program in the image below is an example of the Simple Error Handler in action. It's designed to display an error dialog box at the end of the program, making the error message visible to the user.
Managing Error Messages During Debugging
In the example program shown earlier, the "Simple Error Handler" VI is used at the program's conclusion to avoid interrupting the user with constant error message pop-ups during normal operation.
However, during the debugging phase, it can be beneficial for programmers to have some error messages appear immediately as the program runs. This immediate feedback helps in pinpointing and resolving errors within the program. Connecting a "Simple Error Handler" at key monitoring points achieves this goal. But, while this is helpful for debugging, it might result in frequent and potentially disruptive error pop-ups during actual user operation.
This dilemma can be effectively resolved using conditional disable structures. These structures allow for different program behaviors in debugging and user operation modes. A detailed explanation of these structures will be provided in the Disable Structures section, but here's a quick overview:
Set up a specific conditional disable symbol in your project, such as "DEBUG", to determine whether the program is in debugging or release mode. If "DEBUG" is set to "True" in the project settings, the program will allow error dialogues to pop up as needed.
Create a new VI to encapsulate the "Simple Error Handler". This VI should be configured to permit error dialogues when "DEBUG == True" and suppress them otherwise:
When preparing the program for user release, you would typically remove the project file (.lvproj) to prevent displaying those error messages to the end user. If the project file must be included for the user, simply adjust the "DEBUG" value to "False" before distribution. This change will effectively disable the pop-up error messages.
Error Merging in Parallel Code Execution
When programming sections of code to run concurrently, directly connecting them with error wires is not feasible. However, once these parallel code segments finish executing, it's crucial to pass on any errors that occur to the subsequent parts of the program. To address this, the "Merge Errors" function, located under "Programming -> Dialog & User Interface -> Merge Errors", can be employed to amalgamate various errors before forwarding them:
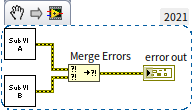
The "Merge Errors" function operates as follows: if there's an error in only one of the multiple input data points (with the rest being error-free), its output will be the data from that errored input. If all inputs are free of errors, the output reflects this too. In cases where multiple inputs have errors, the output will correspond to the first encountered error (the one connected to the topmost terminal).
Most applications don't necessitate logging multiple error messages, so "Merge Errors" typically keeps only the first error message. If, however, there's a need to document every error that occurs during execution, bespoke programming is required. For example, an array could be utilized to compile error information, with each new error message being added as it arises.
Error data management for functions or sub-VIs within loop structures needs a tailored approach based on the specific context. Yet, regardless of the situation, using simple tunnels shouldn't be the sole method for transmitting error data.
Consider a scenario where an error in a single loop iteration makes further iterations redundant. Here, a shift register becomes a practical tool for transmitting error data:
In the program described, "Initialize Test.vi" handles initial steps like opening the device that's being tested and then informs the loop structure about the number of test items to be executed. "Run Test.vi" then selects the appropriate test based on the current iteration, using LabVIEW's standard error handling for exceptions. If an error is encountered in any iteration, "Run Test.vi" outputs an error signal. This error is carried over to each subsequent iteration through a shift register, halting further test execution. Ultimately, the error information is relayed to "Close Test.vi".
In a different scenario, where an error in one test should not halt the subsequent tests, the previous iteration's error information should not be passed to "Run Test.vi" in each new iteration. In this case, using a shift register is not suitable as it would transmit the "Initialize Test.vi" error into the loop. Alternatively, a tunnel can be used to bring the error value out of the loop. To aggregate the errors from each iteration without missing any, an indexed output tunnel can be employed. This forms an array of error outputs from each iteration, which are then consolidated using the "Merge Errors" function:
Additionally, the program must ensure that no error information is lost, even if the number of iterations is zero. As a result, the error from "Initialize Test.vi" should also be included in the "Merge Errors" function to maintain thorough error tracking.
Practice Exercise
- Reflect on how you would handle this situation: You have developed a user interface program where users can set the frequency of a signal generated by a signal generator. Let's say this signal generator is limited to producing signals within two frequency ranges: 5Hz to 50Hz, and 100Hz to 1000Hz. If a user inputs a frequency that falls outside these specified ranges, the signal generator's driver sub-VI will return an error. Your task is to devise an error management strategy that maximizes user convenience by clearly communicating the nature of the error and guiding them on how to rectify it.