UI Modular Division
Dividing Interfaces into Modules
For complex program diagrams, it's beneficial to divide them into multiple sub-VIs. This approach not only makes each sub-VI easier to manage but also significantly improves the readability and maintainability of the program. Similarly, when an interface becomes overly complicated, dividing it into several modules is advisable. This strategy not only aids in the software's programming and maintenance but also simplifies user interaction with the interface.
Some programs require users to input a vast amount of information, such as the "Options" window in LabVIEW:
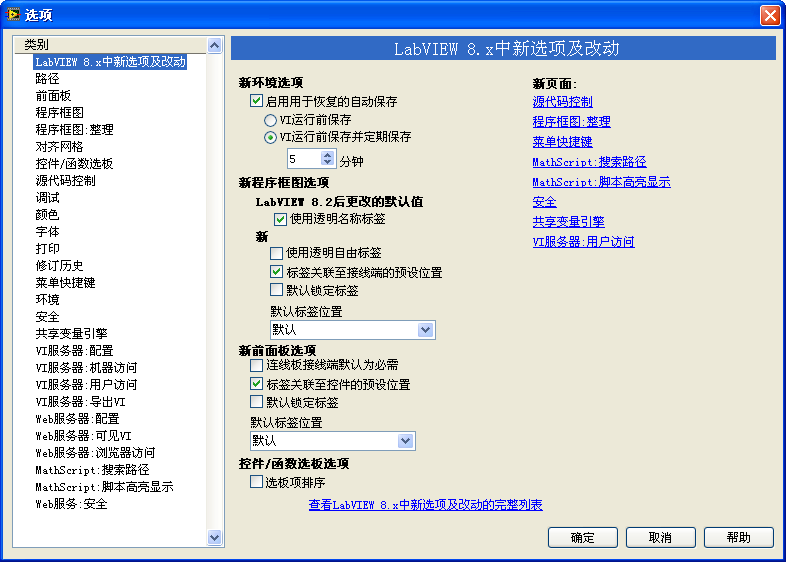
This window provides a plethora of setting options within LabVIEW. Displaying all these settings simultaneously would overwhelm even a large screen. Moreover, an interface cluttered with too many controls can confuse users, making it difficult for them to locate the information they need. Thus, the LabVIEW options interface organizes settings into various groups based on their functionality, displaying only one group at a time. Users can select which group to display using the "Categories" list on the left side of the interface.
Another example is the LabVIEW tool for importing shared libraries, designed to wrap functions from DLL files into LabVIEW VIs. This process demands extensive information from the user, such as the DLL's filename and the names for the generated VIs. Like the previous example, displaying all these settings at once would be daunting for the user. The shared library import tool adopts a solution slightly different from the LabVIEW options window by using a wizard-style interface to guide users through the process. The main difference between a wizard-style interface and the LabVIEW options interface is the method of switching the display page (i.e., which group of controls is shown); one allows for arbitrary display of any page, while the other only permits sequential page switching.
If a program requires inputting extensive information or settings with sequential dependencies, a wizard-style interface is more appropriate.
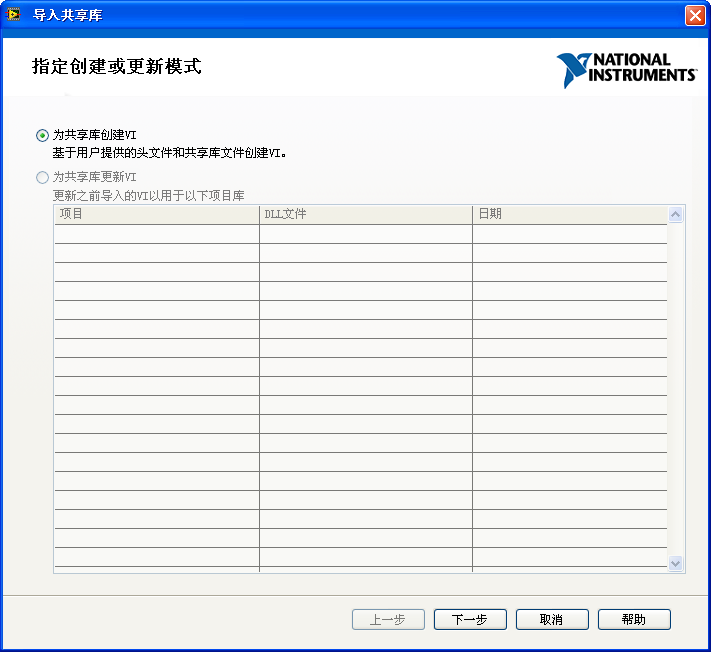
Both types of interfaces discussed share a commonality: they organize a multitude of controls into related groups, displaying only one group at a time to the user, thus making the program interface more clear and user-friendly.
These interfaces, when implemented in programming, use a similar mechanism with the sole distinction being the method of page switching. One allows for the arbitrary display of a specific page, and the other only supports sequential page transitions.
Below, using a wizard-style program as an example, we'll illustrate how to implement multi-page interface programs effectively.
Utilizing Tab Controls for Wizard-Style Programs
Wizard-style programs, characterized by multiple pages each filled with various controls for different functionalities, are perfectly suited for the use of tab controls. Tab controls, a staple in application settings dialogs, consist of multiple tabs. Users can navigate between pages by clicking on their respective labels, causing the control to reveal the content of the selected tab while concealing the others.
In designing wizard-style programs, you can leverage the functionality of tab controls to correspond each wizard page to a tab within the control. By hiding the tab page labels and programmatically controlling which page is displayed, you can streamline the user experience.
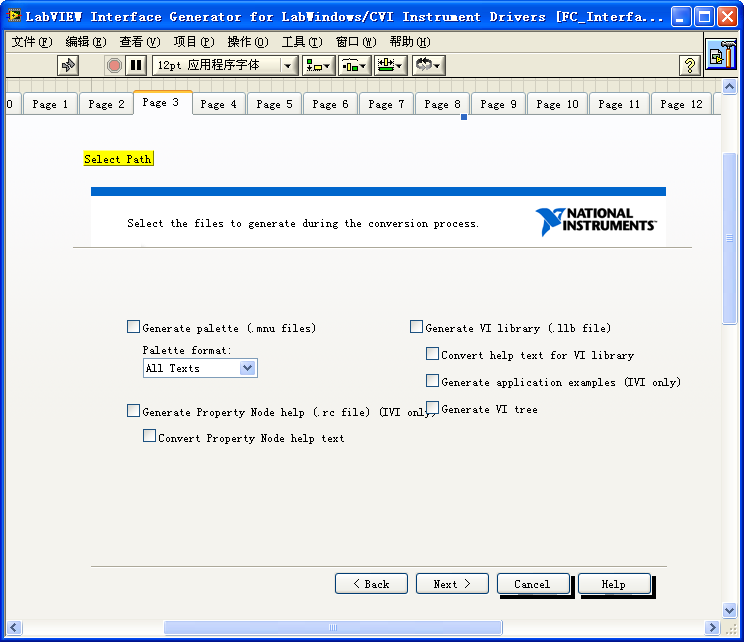
The image above showcases the interface of a wizard-style program in its editing state. When the VI's front panel display area is expanded, a prominently placed large tab control is revealed, with operational controls for the program arranged on the corresponding tab pages.
Upon the user clicking the "Next" button, the program diagram changes the tab control's value to display the subsequent page:
Tab controls drastically simplify both the design and programming of the interface, making it more user-friendly. However, they do not inherently simplify the program's flowchart or enhance the readability and maintainability of the code. Despite employing tab controls, all user-required controls are still located on this main interface VI. Consequently, all related handling, including the code to manage page displays, must be executed on the main VI. For complex interfaces that might require about a dozen pages, this could result in the front panel hosting dozens of controls. If the VI's program diagram is based on a loop event structure, it would necessitate managing a correspondingly large number of events. Below is an image displaying only a fragment of this program's events:
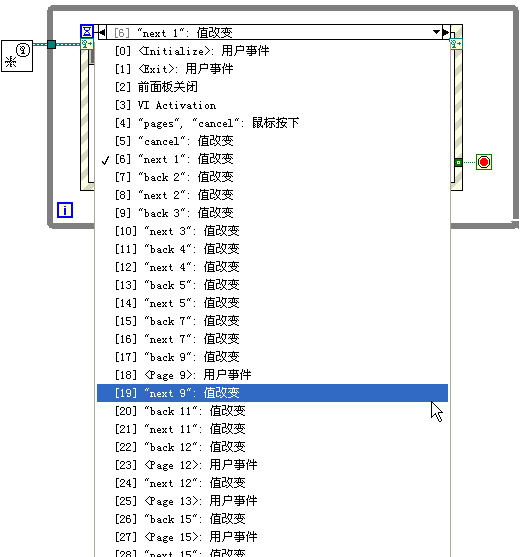
Navigating such a program diagram to grasp its logic or locate a specific event can be daunting, requiring a thorough examination of each event. Adding a new step to an existing wizard significantly amplifies the complexity and workload. Thus, to enhance the readability and maintainability of the program, it's imperative not just to divide the interface into pages but also to modularize the code handling these segments.
Subpanels
The subpanel control is located in the "Modern -> Containers" section of the control palette. It allows the display of one VI's front panel within the main interface of another VI. To utilize a subpanel control, drag it onto the main VI's front panel. Initially, it appears as a transparent rectangle. This control is unique; it requires programming in the VI's block diagram to show the front panel of a different, child interface VI when the main interface VI runs. An empty subpanel control looks like this:
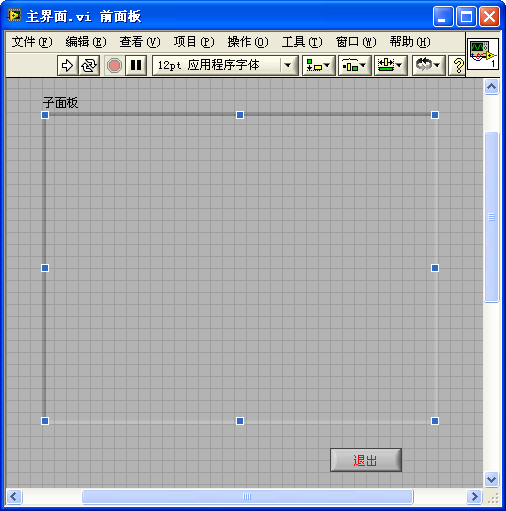
For demonstration purposes, create a child interface VI. When the main interface VI is executed, the subpanel control will show the front panel of this child interface VI:
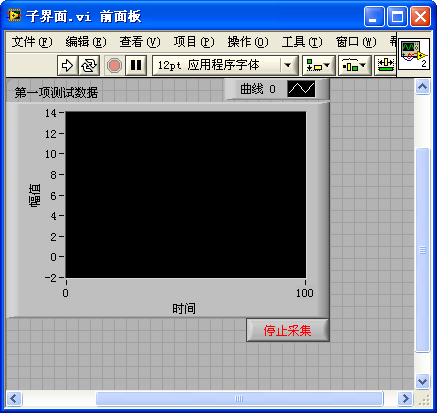
Next, the code for loading the subpanel must be developed. Differently from other controls, placing a subpanel control on the main VI's front panel doesn't create a corresponding terminal in the VI's block diagram. Instead, it presents an invoke node labeled "Insert VI". This node's purpose is to insert another VI's front panel into the subpanel control. The "Insert VI" node's input is the reference to the child interface VI whose front panel is to be displayed. Therefore, the first step is to open the reference to the child interface VI using VI Scripting functions and nodes, and then pass it to the subpanel control's "Insert VI" method:
Two important considerations: firstly, if the child interface VI's front panel is already open, it cannot be inserted into the subpanel control; therefore, its front panel must be closed. Secondly, to observe and control the child interface from the main interface, the child interface VI must be operational. Thus, it is essential to run the child interface VI to enable its functionalities.
After launching the main VI, the following appearance is achieved. Within this main VI, it's possible to monitor and control changes on the child interface.
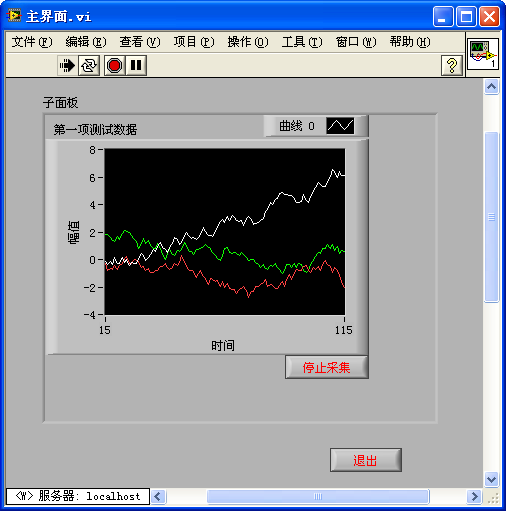
Looking back at the wizard-style application interface we previously discussed, its primary challenge was managing the overwhelming number of controls on the main interface, which made maintenance difficult. By utilizing subpanel controls, we can identify a more effective approach: employing a plugin framework architecture for developing wizard-style programs. The illustration below depicts the structure of such a plugin framework program.
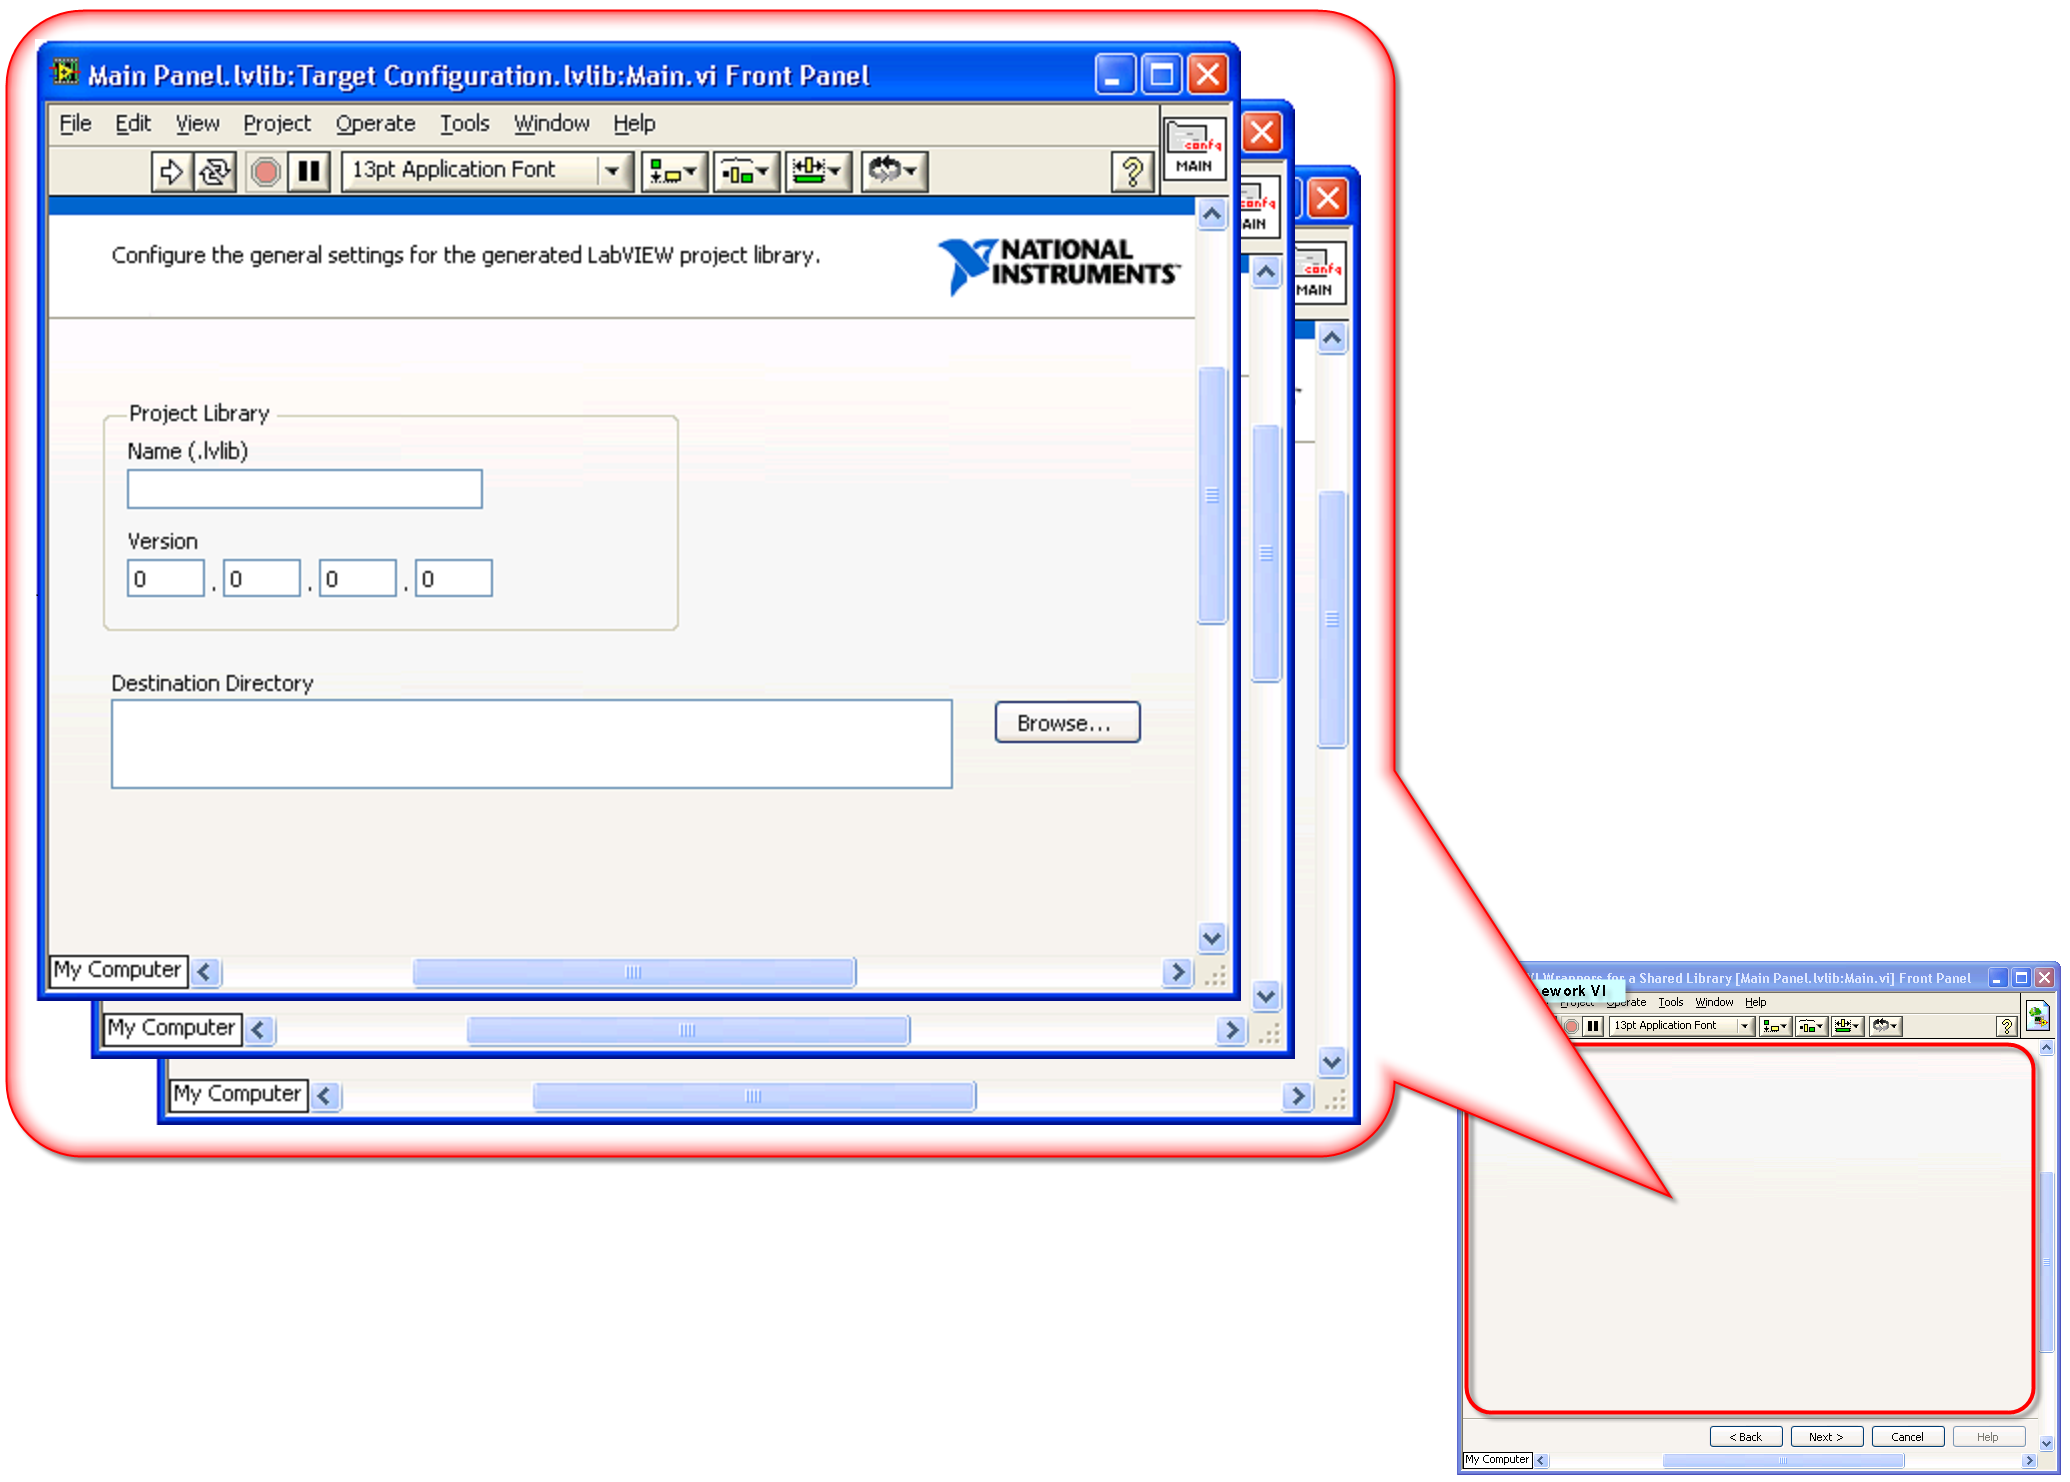
The essence of the plugin framework program is to assign each page of the wizard interface to a distinct child interface VI. Each of these pages' operations is fully managed within its respective child interface VI. The top left portion of the diagram showcases the child interface VIs designated for each page. Treated as plugins, these VIs are invoked and displayed on the main interface as required by the main program.
The main program (main interface) VI, shown at the bottom right of the diagram, primarily features a subpanel control on its front panel. This control is tasked with displaying the front panels of the page VIs. To exhibit a specific step within the wizard, the main program adjusts the subpanel to show the front panel of the corresponding step VI, thereby facilitating the wizard functionality. Additionally, some universal controls, such as "Previous" and "Next" buttons, are placed on the main frame. These buttons are consistently needed across all steps and thus eliminate the need for duplication across each page.
Employing a subpanel control within the plugin framework simplifies the design and coding of complex program interfaces by segregating it into several manageable child VIs. Each child VI maintains a simpler interface and codebase, substantially easing the program's overall maintenance.
Nevertheless, there are some drawbacks to using subpanels. For instance, displaying child interfaces necessitates writing some extra code. In edit mode, the inability to view child interfaces hampers interface adjustments. Additionally, data exchange between the main interface and child VIs, as well as among child VIs, could be improved for convenience. Lastly, making child interfaces available as reusable modules for other programs presents challenges.
XControl
In software development, especially within a single company, there's often a need to share interface modules across multiple applications. To facilitate this, these modules should be as easily integrated into a LabVIEW VI's front panel as any built-in control, allowing for straightforward resizing and data exchange with other program elements.
One might wonder if LabVIEW's custom controls could serve as these shared modules. Unfortunately, they fall short because while they allow for the customization of a control's appearance, they do not permit the same flexibility with its behavior. Complex shared interface modules typically require some level of customized behavior, which is where components come in. These are relatively independent modules with specific interfaces and functionalities, like the component shown below.
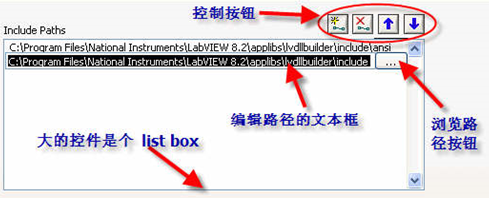
This component is designed to assist users in selecting and managing a set of paths. If an application necessitates user input of multiple paths, this component can be directly utilized, streamlining the process.
The component's interface is made up of several basic controls: a list box to display paths, a text box for path editing, a button to open a path browsing dialog, and four buttons for path management (add, delete, and reorder).
Beyond its interface, this component incorporates custom behaviors. Initially, it merely displays paths, with the text box and browse button hidden. Once a user selects a path for editing, the component reveals the text box and browse button, pre-populating the text box with the selected path for easy editing. Other behaviors include opening a browsing dialog when the browse button is clicked and moving a selected path when the appropriate button is pressed.
This component's interaction with the rest of the program is straightforward, revolving around the manipulation of a path array. This simplicity and clarity in functionality make it an ideal candidate for a shared module.
However, can LabVIEW's custom controls be used as such modules? They cannot, primarily because they do not allow for behavior customization, a key requirement for more complex shared interface modules, which are essentially components. An example is the path management component pictured above.
LabVIEW offers a solution in the form of XControl. XControl allows for the creation of controls that not only have a customized appearance but also bespoke behaviors. These can be shared across applications or published for customer use, just like native LabVIEW controls. They're designed to be drag-and-dropped onto a VI's front panel and used seamlessly within a program, offering a higher degree of integration and utility than traditional custom controls.
Implementing Applications with Multiple Interface Styles for the Same Functionality
Imagine you need to develop an application that will be sold to various users. While the functionality required from the software remains constant across users, their preferences for the software's interface might vary significantly. For instance, a testing program for a single product might need different interface versions tailored to various languages, as well as specific control layouts, sizes, and colors for each version. Ideally, developers would want a single codebase (the program's block diagram) that could adapt to multiple interfaces (VI front panels). However, this isn't straightforward with conventional methods, as each VI in LabVIEW is traditionally limited to one front panel and one block diagram.
Typically, the VI that constructs the main interface of the program serves as the main VI, containing the bulk of the complex code. Managing multiple complex yet functionally identical main VIs within a project is far from optimal. It leads to extensive code duplication, inflates the program size, and necessitates parallel modifications across all versions whenever a bug is discovered or a functional adjustment is required.
Dynamic event registration offers a solution to streamline such programs. One of its key features is the complete decoupling of the interface from the code logic. To address the outlined needs, developers can create multiple VIs for different interface styles (referred to as "interface VIs"), alongside a single VI dedicated to handling functions without displaying an interface (referred to as "function VI"). The interface VIs need only minimal diagram complexity, just enough to keep the program running (possibly requiring an empty loop) and to relay control references to the function VI. The function VI's interface, not meant for display, leverages its diagram for execution. This setup ensures that each VI within the project has a clear focus: managing either the interface or executing functionalities. Alterations to the program's functionalities or tweaks to a specific interface style require updates to just the respective VI, eliminating the redundancy of code across VIs and significantly boosting maintainability.
Let's consider a simple example: executing the same basic function—generating a random number upon a button click—across two drastically different interface styles. This example project comprises three VIs: Main.vi acts as the function VI, whereas Interface1 and Interface2 serve as two distinct style interface VIs.
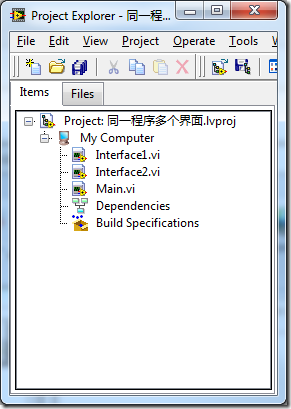
The functionality is encapsulated within Main.vi, employing a conventional event structure.
There are two distinct approaches to accomplish this project setup. The first method is straightforward and suitable for less complex interfaces; the second method is more comprehensive, catering to more elaborate requirements. Both methods will be elucidated below.
First Approach
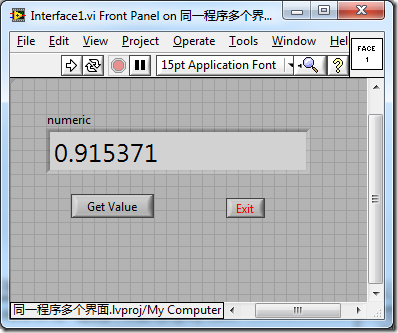
In this first approach, the program initiates with either interface1.vi or interface2.vi as the start-up VI. Shown below is the front panel of interface1.vi, which comprises three straightforward controls:
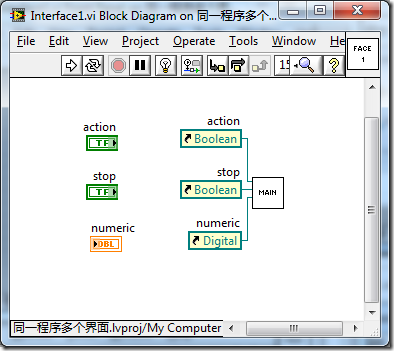
The block diagram of interface1.vi doesn’t carry out any detailed tasks. Its sole purpose is to pass the references of all interface controls to Main.vi and initiate Main.vi as a subVI:
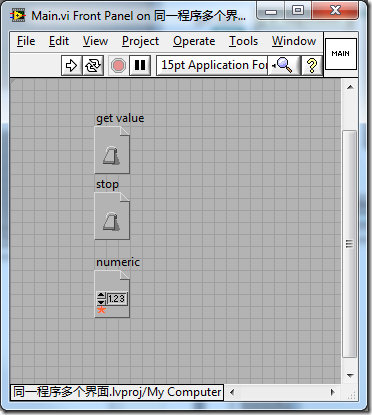
Main.vi lacks a displayable interface; the controls on its front panel are strictly for data entry:
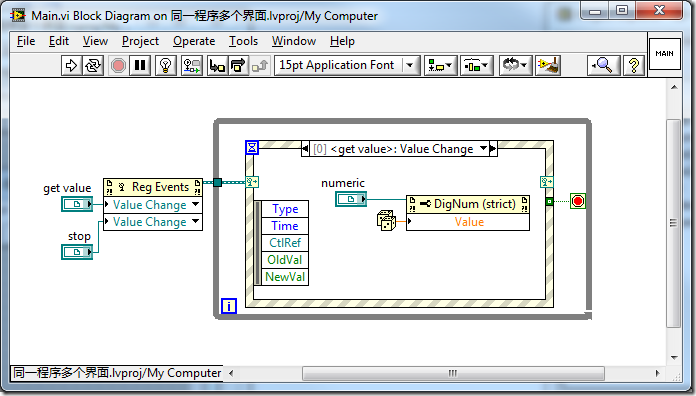
In Main.vi, the event structure dynamically registers to receive events from controls in interface1.vi. Consequently, when the "get value" button in interface1.vi is pressed, it generates a random number and assigns it to the numeric control:
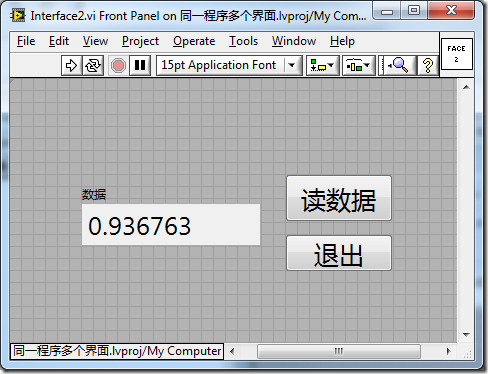
The front panel of interface2.vi contains controls identical to those in interface1.vi, albeit with a completely different style and layout:
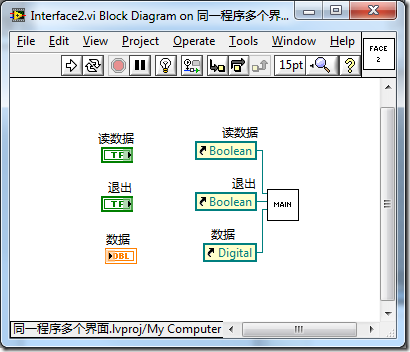
The block diagram for interface2.vi mirrors that of interface1.vi:
Given that the functionality of the program is fully encapsulated within Main.vi, any modifications needed for the program's function require updates to only this VI.
Second Approach
In the second method, Main.vi serves as the startup VI, simplifying the block diagrams of interface1.vi and interface2.vi even further. They don't require the invocation of any subVIs, only needing a simple while loop to ensure continuous operation:
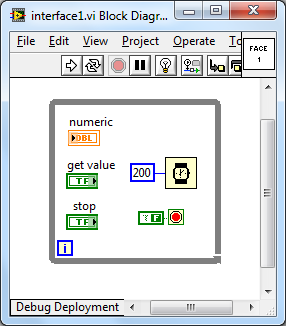
However, the programming within Main.vi becomes more complex as it shoulders the responsibility of launching and displaying the interface VIs:
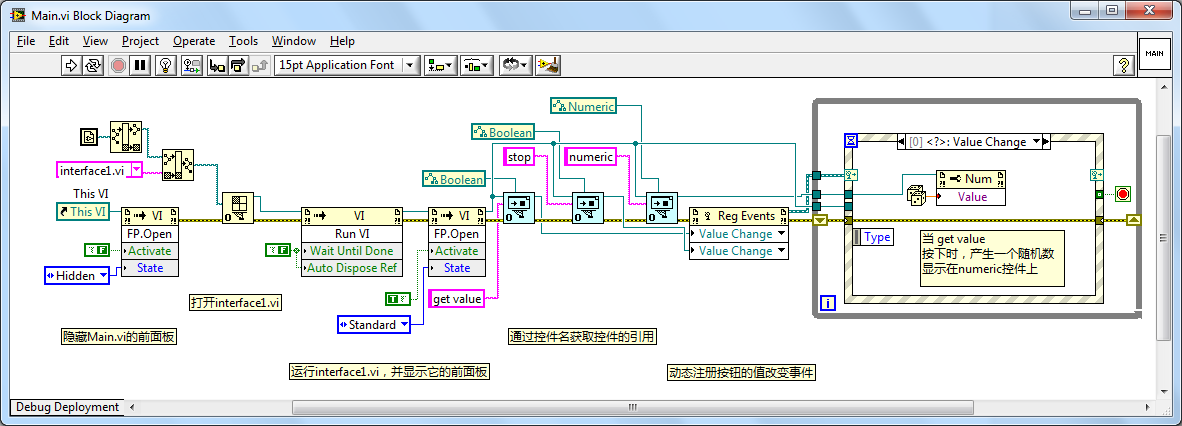
This method does not rely on interface VIs to actively pass control references to Main.vi, necessitating Main.vi to fetch these control references independently. To locate a control's reference by its name, the program employs the "Open VI Object Reference" function. This function isn't included in LabVIEW's default set of functions but is thoroughly explained in the section "Dynamically Creating and Modifying VIs" of this book.
Once the control references are acquired, the remainder of the program operates similarly to the first method. This setup grants the program abilities akin to those of a traditional main VI, such as reading and writing values of controls on the interface and capturing events emitted by controls. Interface2.vi's block diagram mirrors that of interface1.vi in this setup. A crucial point is that this strategy hinges on the consistency of control labels across each interface VI, necessitating identical labels for corresponding controls.
In this example, we opted to conceal Main.vi's front panel, choosing instead to display the front panel of either interface1 or interface2. This effect could also be achieved using a subpanel, treating Main.vi as a framework and interface1 or interface2 as plug-ins.
This design strategy effectively segregates the program's interface from its functional components into distinct VIs. As a result, it's feasible to alter the program's interface without impacting the functional code and vice versa.