Loading and Executing Sub VIs
Static vs. Dynamic Loading of Sub VIs
In general, when a VI is opened, all its sub VIs are also loaded into memory at the same time. This method is referred to as static loading. For small-scale applications, this approach poses no issue. However, for larger applications composed of hundreds or thousands of sub VIs, loading all sub VIs alongside the main VI can lead to two significant problems: excessive memory consumption and slow startup times.
Large applications invariably contain sub VIs that are seldom used within certain execution branches. Based on their frequency of use, sub VIs can be divided into three categories: frequently used (e.g., a sub VI that runs three or four times out of ten main program launches); occasionally used (e.g., a sub VI that runs less than ten times out of a hundred launches); and rarely used (e.g., a sub VI that might run once in over a hundred launches). Loading these occasionally and rarely used VIs into memory at startup, when they may not be utilized for extended periods, occupies valuable memory and contributes to longer startup times, just like the frequently used sub VIs.
The strategy to mitigate this issue is simple: avoid loading these sub VIs at the start of the program, and instead, load them into memory only when they are needed. This approach ensures that memory is not allocated to them until required, conserving memory resources. Moreover, by reducing the number of sub VIs loaded at startup, the initial launch speed of the program is enhanced. The time consumed in loading these sub VIs is thus distributed throughout the runtime of the program.
Additionally, sub VIs that are rarely used can be unloaded immediately after their execution to save memory. However, sub VIs that are used more frequently should remain in memory, as the process of unloading and reloading VIs is time-intensive.
Accessing the "Call Setup..." option from the sub VI's right-click menu opens the "VI Call Configuration" dialog. Here, you can determine when the sub VI should be loaded into memory. By default, it is set to "Load with caller".
In the depicted program below, let's assume the sub VI "Task B" is called only on rare occasions. Therefore, it can be configured to "Load and retain on first call". As a result, "Task B.vi" will be loaded into memory only upon its initial execution. If it were set to "Reload on each call", then the sub VI would be removed from memory after each run.
Once a sub VI is configured as either "Load and retain on first call" or "Reload on each call", the program utilizes the "Call by Reference Node" to invoke these sub VIs. This changes the appearance of the sub VI's icon; it no longer resembles a typical sub VI but adopts the appearance of a "Call by Reference Node" (which is found under the "Programming -> Application Control" function palette). The icons for these two configurations differ slightly: an hourglass symbol is present in the upper left corner for "Load and retain on first call", which is absent for "Reload on each call".
The "Call by Reference Node" is specifically designed for controlling when a sub VI is loaded into memory during the programming phase. For a more flexible approach to managing VI loading, the "Open VI Reference" function comes into play, allowing for the opening of a reference to a VI.
Opening a VI's reference will load it into memory if it isn't already there. If the VI is already loaded, it will not be reloaded. The "Open VI Reference" function necessitates a "VI Path" input—if the VI isn't in memory, its complete path is required to open its reference; however, if the VI is already in memory, simply entering its name will retrieve its reference.
The "Close Reference" function is used to close an opened VI reference. If a VI was loaded into memory solely through the "Open VI Reference" function and all references opened in this manner have been closed, then the VI will be removed from memory.
Dynamic Invocation of VIs
Ordinarily, the timing for invoking a standard sub VI or one called via a "Call by Reference Node", as previously discussed, is determined during the editing phase. However, there are scenarios where the program needs to decide which sub VI to load and run while it is already executing. This procedure of dynamically loading and executing sub VIs is referred to as dynamic invocation.
Executing a dynamic invocation of a sub VI typically involves three main steps: dynamically opening a VI, running the VI, and then closing the VI's reference.
To achieve dynamic invocation of sub VIs, there are three prevalent methods: The most straightforward method involves using the "Call by Reference Node"; the second method employs the VI's "Run VI" method; and the third method, which will be explained in more detail, involves asynchronous calling techniques.
The "Call by Reference Node" was mentioned earlier when discussing how to set a VI's loading method through the sub VI's "Call Setup" options. Another approach for utilizing this node involves placing it on the block diagram and passing a dynamically opened VI reference to its "reference" input. This enables the node to dynamically open and run the input VI. The icon of this node, when placed on the block diagram, has a slight difference compared to that obtained through the "Call Setup" option, with a small "reference" symbol present at the input/output reference ports:
The "Call by Reference Node" can only accept VI references that include type specifiers. Hence, when using the "Open VI Reference" function, specifying a "type specifier" is essential:
A "type specifier" clarifies the connector pane pattern of the dynamically opened VI and the data types of each parameter. This specification ensures that when the VI runs via the "Call by Reference Node", it receives and outputs appropriate parameters. To specify a "type specifier", right-click on the "type specifier VI reference handle (for type use only)" parameter of the "Open VI Reference" function and create a constant. Then, by right-clicking on the newly created constant and selecting "Choose VI Server Class -> Browse", select a VI that matches the dynamically invoked VI's connector pane pattern and data type exactly. As a result, the sub VI shown inside the "Call by Reference Node" will appear in the form of its connector pane, allowing it to execute any VI with this specific connector pane pattern. The path input into the "Open VI Reference" node is used to specify the particular VI that is to be invoked.
Another approach is to invoke a VI's "Run VI" method using an invoke node. This method does not necessitate specifying the VI's type specifier, although exchanging input and output parameters between the caller and the called VIs can become somewhat complex:
To set input parameters, it's necessary to use the VI's "Control Value -> Set" method to assign values to controls corresponding to the input parameters before running the VI. To capture output parameters, after the VI has finished running, the "Control Value -> Get" method retrieves the values from controls associated with the parameters.
The "Run VI" method comes with two input parameters for configuring the execution mode.
The "Wait Until Done" parameter defaults to "True". When "Wait Until Done" is "True", the program immediately begins running the called sub VI upon reaching this command, pausing until the sub VI completes before proceeding with subsequent code. This aligns with the behavior of a standard sub VI and one invoked through a "Call by Reference Node". Setting "Wait Until Done" to "False" allows the main VI to continue with its subsequent code while the called sub VI starts its execution.
There's often a requirement for the main VI to operate within one thread while the sub VI runs independently and in parallel within another thread. This dynamic calling method satisfies such a need. As discussed in the section on "Event Structures and User Interface", the best practice for handling time-consuming code within loop event structures is to execute the lengthy code in a separate thread, thus not hindering the main program's ability to process upcoming events. This can be accomplished by isolating the time-consuming code into a separate sub VI and invoking it dynamically without waiting.
References opened via the "Open VI Reference" function must be closed to avoid the VI staying loaded in memory indefinitely, potentially leading to memory leaks. The Auto Dispose Ref parameter determines who is responsible for closing the dynamically run VI's reference: whether to manually unload the sub VI using the "Close Reference" function or allow it to automatically unload once the sub VI completes its execution. If set to "False", the reference needs to be manually closed with the "Close Reference" function after the sub VI concludes. If set to "True", there should be no further use of the "Close Reference" function. The default setting for this parameter is "False".
Sub VIs dynamically invoked via the "Run VI" method can also be stopped using the "Stop VI" method.
Threads with User Interfaces
Sometimes in programming, you encounter a scenario where a program with a primary interface needs to call the same sub VI multiple times, allowing the sub VI to run multiple instances concurrently and display several interface windows. For instance, if a sub VI provides a monitoring interface for a valve, and the main program needs to monitor multiple identical valves simultaneously, how should this be implemented?
To open multiple instances of a sub VI, the sub VI must be set to reentrant. Thus, the initial step is to configure the sub VI as reentrant. However, this adjustment alone is insufficient. When the main program runs and opens the sub VI, it waits indefinitely until the sub VI has completed execution before it proceeds with the rest of the code. Since the main VI is paused, it naturally cannot continue to open additional sub VIs.
The workaround is to dynamically call the sub VI without waiting for the sub VI to finish execution:
With this approach, once the main program invokes the sub VI, it immediately moves on to the subsequent code in the main VI, allowing for additional sub VI calls.
It's crucial to remember that because the sub VI to be opened is reentrant, the "options" parameter of the "Open VI Reference" function needs to be set to "8".
Plugin Architecture
Let's revisit the loop condition structure program we introduced in the "State Machine" section:
This program accepts a sequence of test tasks as input, enabling users to specify which tasks should be executed during runtime. While this setup offers a degree of flexibility, it's also limited: the program is hardcoded to run only four tasks: A, B, C, and D. If users have new requirements and develop a new task E sub VI, the main program needs to be updated to incorporate this new task.
However, a more flexible design approach is the "Framework - Plugin" structure. In this setup, the main body of the testing program acts as a framework, and each test task functions as a plugin. With new requirements, there's no need to modify the framework; simply creating a new plugin VI and placing it in the designated location allows the framework to load and utilize it.
The essence of a framework-based program lies in using dynamic invocation to run plugin VIs. The initial step in designing such a program involves defining the plugin specifications. This includes standards for naming or storing plugin VIs so the framework can accurately find them, and specifications for the plugin's parameter interface, enabling the framework to pass the correct parameters to each plugin.
For instance, the program illustrated below follows a convention where any file within the "Plugins" subfolder is treated as a plugin. To add new plugins, they are simply placed into this folder. Each plugin adheres to a connector pane style, ensuring that parameters are passed consistently to each plugin using the same format. Regarding the execution order of the plugins, it's sufficient to name the plugin files so their first letter follows a sequential order.
Background Tasks
In many applications, you'll find tasks that don't require direct user interaction. These tasks typically run in the background, silently carrying on without interrupting the user's primary activities. Such tasks are aptly named background tasks, whereas tasks that users directly interact with or see in action are called foreground tasks.
Take, for example, a text editing software. The tasks that assist a user in editing text would be considered foreground tasks. A well-designed text editor would feature an auto-save function, ensuring that, in the event of a sudden system crash, the user's unsaved changes aren't lost. This auto-save functionality typically operates as a background task, running without disrupting the user's other activities. LabVIEW, too, incorporates an auto-save feature, enabling recovery of programs to their pre-crash state upon reopening. The applications for background tasks are vast.
LabVIEW can also facilitate background tasks through dynamic invocation. Below is a straightforward example.
The image below showcases a user interface VI intended for user interaction, thus acting as a foreground VI. In this VI, a control's display value is controlled by a background process, which operates independently from the user's interactions with other controls on the interface:
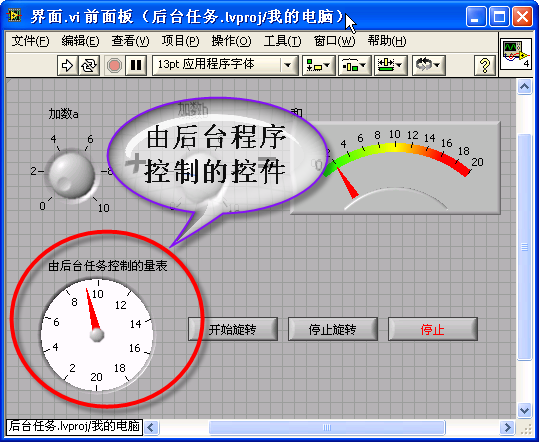
The next image presents the background program, which continuously changes the control's value via its reference. This makes the control seem to be constantly active from the user's perspective.
The subsequent image illustrates the block diagram for the foreground VI, which dynamically invokes the background task VI. This setup allows the background task to run in parallel with the foreground program but on separate threads. As a result, the background task's operations are independent of the foreground VI, ensuring no interference between the two.
It's crucial to remember that the foreground program must terminate the background task before exiting:
Interface programs based on event loop structures aren't well-suited for executing time-consuming tasks within an event handling branch. If responding to interface events while running a lengthy task is necessary, it's advisable to treat the time-consuming task as a background task.
Splash Screen
Launching a large LabVIEW program can sometimes be time-consuming, especially on computers with lower speeds or limited memory. This delay arises because the program needs all its sub VIs to be loaded into memory before it can start running. Loading numerous sub VIs takes time, and if there's no visible change on the display interface during this period, users might mistakenly think the program has crashed or is frozen, potentially leading to incorrect actions. A well-designed program will display a splash screen immediately upon startup. This splash screen should include a progress indicator, informing the user that the program is loading and showing the loading progress. Meanwhile, all sub VIs are loaded into memory before the program's main interface is launched.
While the splash screen is displayed, and after all sub VIs are loaded, the splash screen VI dynamically invokes the main VI, initiating its display and operation. The splash screen then closes itself, allowing the main program interface to take the forefront.
The code for implementing a splash screen is illustrated below:

The splash screen code essentially involves three steps: loading the sub VIs into memory, running the main VI of the program, and closing the splash screen.
To load the sub VIs into memory, simply opening their references with the "Open VI Reference" function suffices. However, a strategy is needed for the splash screen VI to access all sub VIs. A simple method is to place all sub VIs in a designated folder, such as "subVIs". The splash screen VI finds all VIs within this folder and opens their references sequentially. As each sub VI is opened, the progress of the loading process is calculated and displayed based on the total number of sub VIs and the number already opened.
Running the main VI involves dynamically invoking it. This starts with opening the main VI's reference and then using the "Run VI" method to execute it. Unlike background tasks, the main VI's interface is meant to be visible to the user. Thus, setting the main program VI's "Front Panel Window -> Open" property ensures its interface becomes visible. Once the main VI is up and running, all the references to the just-opened sub VIs can be closed. Closing these references doesn't remove the sub VIs from memory because the main program also requires these sub VIs.
Once the main VI is operational, the splash screen has served its purpose and should give way to the main program. This is achieved by closing the splash screen interface through the "Front Panel Window -> Close" method. With the completion of the splash screen's operation, the startup process ends.
Asynchronous Calling
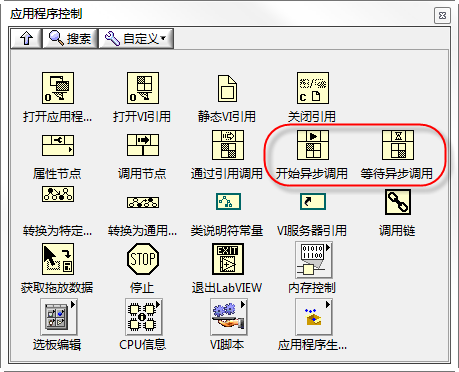
In 2011, LabVIEW introduced the "Start Asynchronous Call" function, a notable addition that simplified the coding complexity for implementing dynamic VI calls and initiating background tasks previously discussed. You can find this new function in the "Programming -> Application Control" section of the function palette:
Imagine the task of programming an application with a user interface featuring a gauge and two control buttons:
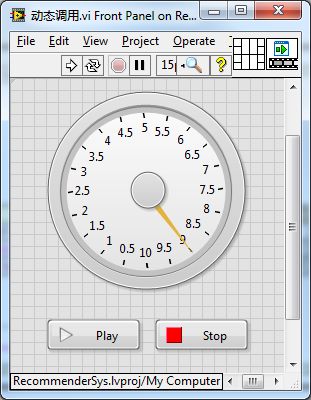
The program is designed such that pressing the Play button initiates the rotation of the gauge needle. Pressing the Stop button exits the program. The needle's rotation involves moving every 10 milliseconds, completing a full revolution every two seconds, and ceasing after five revolutions or 10 seconds. Maintaining the gauge needle's rotation is a continuous task that shouldn't interfere with other functions, like reacting to the Stop button.
To ensure the gauge's continuous motion without hindering other tasks, a separate thread is allocated for this job. This thread is housed within a distinct sub VI, equipped with two input parameters: references for the gauge and the Stop button:
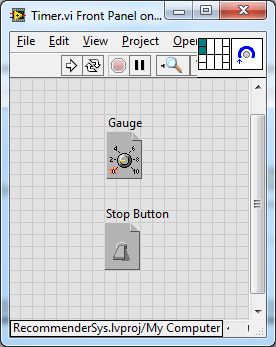
Below is the program code for this VI:
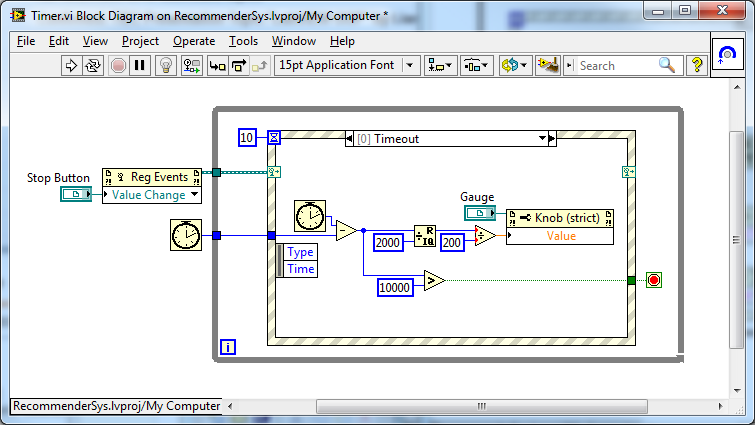
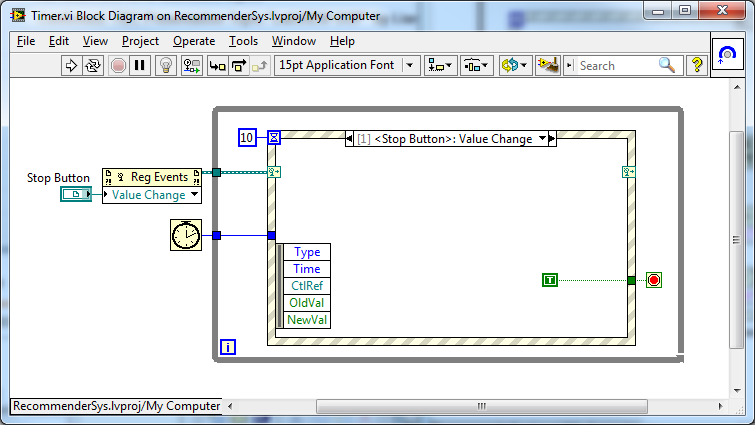
In its timeout event branch, the VI updates the gauge needle's position every 10 milliseconds, making a full circle every two seconds, and concludes after 10 seconds. This event structure also monitors whether the Stop button in the main program has been activated, halting immediately if so:
Prior to LabVIEW 2011, dynamically invoking and running the "Maintain Gauge Rotation VI" using the VI's "Run" method node was the sole approach to implement the main program's functionality, illustrated in the following program block diagram.
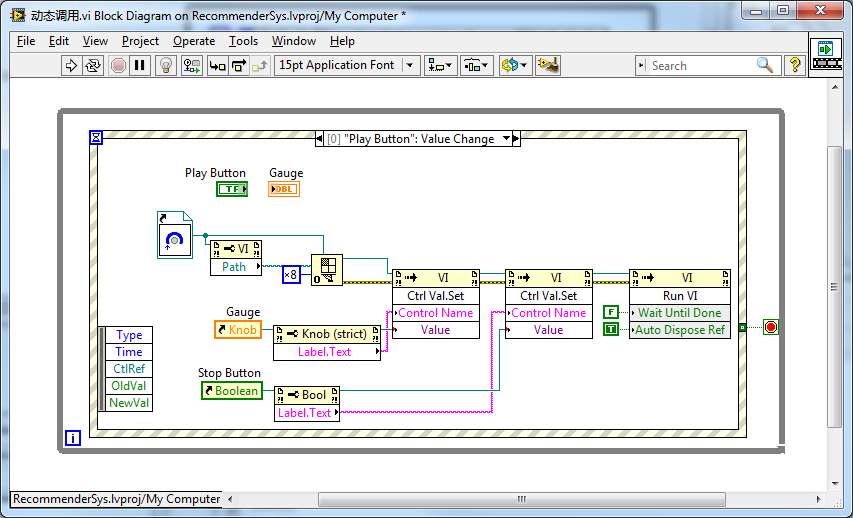
The least satisfactory aspect of this approach is the necessity to pre-pass parameters to the sub VI using the "Set Control Value" method. Not only is this method cumbersome to write, but it also poses security risks. Firstly, it locates controls for parameter transmission by their names, which LabVIEW cannot verify for correctness at compile time. Any changes to the control names within the sub VI would not be detected during compilation, leading to runtime errors. Secondly, it doesn't check the data types of the passed parameters, meaning errors from passing incorrect data types would not be caught during compilation.
Using the "Start Asynchronous Call" function not only resolves the previously mentioned challenges but also results in more streamlined code:
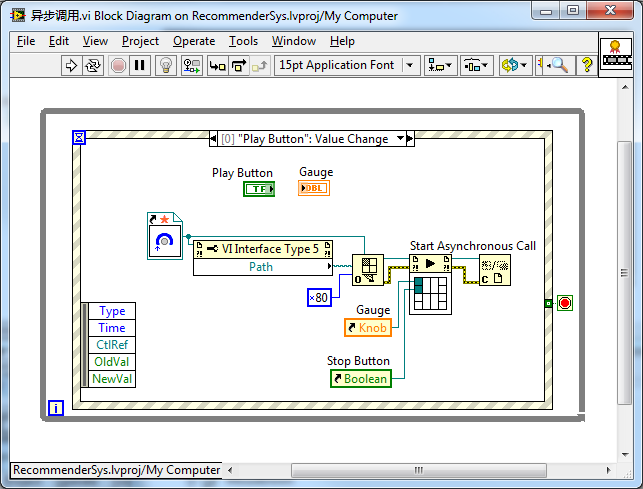
It's crucial to remember that before employing the "Start Asynchronous Call" function, when you're opening a VI reference, you must pass a 0x80 value to the "Open VI Reference" function. This indicates that the opened VI reference will be utilized for an asynchronous call.
The usage of the "Start Asynchronous Call" function bears a strong resemblance to the "Call by Reference" method, and thus won't be elaborated on here. Their primary distinction lies in their synchronization: "Call by Reference" executes synchronously, pausing the main program until the called sub VI completes; whereas "Start Asynchronous Call" operates asynchronously, allowing the main VI to proceed with subsequent code immediately after launching the sub VI.
Function-wise, "Start Asynchronous Call" aligns with setting "Wait Until Done" to False in the "Run VI" method. The advantage of the former is that it simplifies parameter passing and clarifies the code.
Alongside the "Start Asynchronous Call" in its function palette is the "Wait on Asynchronous Call", intended for capturing return data from the invoked sub VI. Relative to "Start Asynchronous Call", the "Wait on Asynchronous Call" sees limited use and is uncommon. This is because if awaiting the outcome of a sub VI is necessary, the differentiation between asynchronous and synchronous calling diminishes.
Both example diagrams, regardless of using the "Run VI" method or the "Start Asynchronous Call" function, necessitate a "Static VI Reference" node to obtain the called VI's reference (for a detailed explanation on "Static VI Reference" nodes, see the section on "Changing Interfaces During Runtime"). The distinction lies in the "Static VI Reference" node within the "Start Asynchronous Call" function featuring a star symbol, signifying a strictly typed VI reference. Selecting "Strictly Typed VI Reference" from the right-click menu of the "Static VI Reference" node configures it to a strict type:
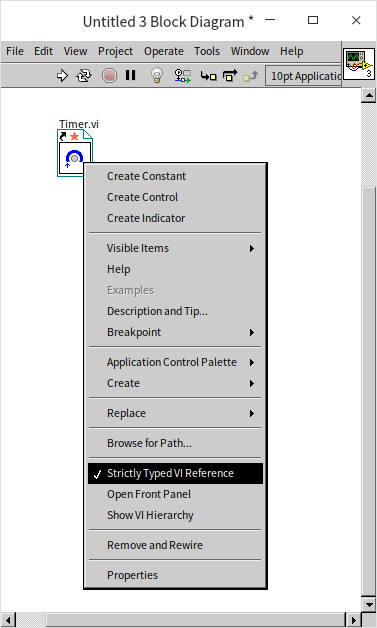
A strictly typed VI reference specifically denotes VIs with a particular connector pane type. Because the "Start Asynchronous Call" function depends on the VI's connector pane information, it necessitates strictly typed VI references.
From LabVIEW 2011 onwards, when a "Strictly Typed VI Reference" serves as the reference input for property and invoke nodes, the notation above these nodes changes from simply indicating "VI" to showing "VI Interface Type n" (where n represents a number).