File I/O
Understanding Binary and Text Files
In LabVIEW, the functionalities and VIs (Virtual Instruments) for file reading and writing are predominantly located in the "Programming -> File I/O" function palette:
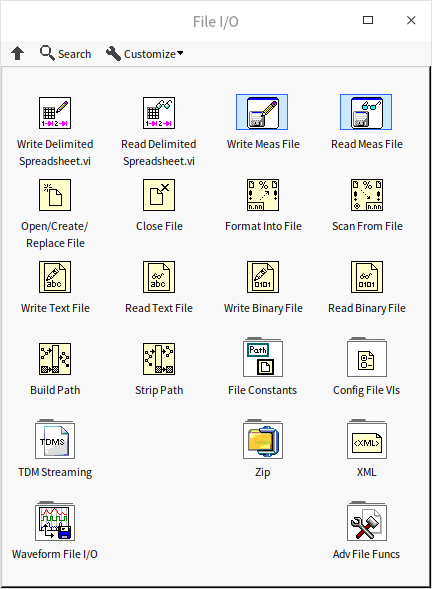
This palette showcases a range of functions for handling different file types. These types are primarily differentiated by the data organization format within the files. However, if we disregard the format and focus solely on the data content, we can categorize files into two primary types: binary and text files. In a binary file, each data byte is represented as a U8 integer, which can range from 0 to 255. This byte doesn't necessarily represent an integer in the file; it could signify various other data types. In contrast, text files consist of bytes that correlate to the binary values of characters readable by humans, such as letters, numbers, punctuation, spaces, and line breaks. Text files are directly readable when opened with a text editor, while binary files typically display as incomprehensible gibberish.
To be precise, text files are also a form of binary file in a broader sense, as they too are stored as sequences of binary numbers. However, our comparison here focuses on the differences between narrowly defined binary (non-text) files and text files.
Binary files write data in its raw format directly to the hard drive, benefiting from smaller space consumption. However, these files may contain diverse data types of varying lengths, and without knowledge of the binary file's format, it’s challenging to identify the stored data. Binary files require specific programs or functions for reading and writing; on the other hand, text files consist of data in string format, easily recognizable and editable with text editors.
Take, for instance, the number "38749.928398387799". In binary format, it typically requires 8 bytes of storage (as a double-precision floating-point number), or 4 bytes for less precision (single-precision floating-point number). As a text file, it would need at least 18 bytes, corresponding to the string's length. Given that text files often include separators and additional information, the same data might consume several times more space in a text file than in a binary one.
Binary files excel in both space and time efficiency. Smaller files mean shorter read/write times. In many applications, data is already in binary format in memory and can be directly written to binary files. Saving as a text file, however, requires conversion into strings, significantly impacting speed.
In conclusion, use binary files for speed, and text files for ease of use. For utmost storage efficiency without concern for speed, consider compressing files. Some file types strike a balance, containing both binary and text elements. For example, data might be stored in binary, while easily readable content like channel names and user names are in text format.
Next, let's explore the basics of file reading and writing in LabVIEW.
Reading and Writing Binary Files
Binary files are versatile, capable of storing various types of data such as arrays and clusters. An important aspect to remember when writing data to these files is to keep track of the data types and the sequence in which they are written. When retrieving data, it's essential to follow the same type and order to accurately read back each piece of written data. If you're working with a binary file created by someone else, without knowledge of its data format, extracting the correct information becomes virtually impossible.
The image below illustrates a typical program for writing binary files, which in this example, saves 10 integers in a loop.

The program begins with the "Open File" function, which opens a file at a designated path. If this function isn't given a specific file path, it triggers a file selection dialog box during execution, prompting the user to pick a file. This dialog box has limited options, and we'll discuss a more advanced file selection dialog later on. It's worth noting that both "Write Binary File" and "Read Binary File" functions can also launch a file selection dialog if no file path or handle is specified, but this approach is typically avoided in program design.
The "Open File" function offers various operations like creating or replacing a file. Generally, if your goal is to read or modify an existing file, then you should opt for the "Open" operation. In this scenario, if the file is not found, the function will report an error. Conversely, if you intend to write a new file, you should select the "Create" operation, which will also report an error if the file already exists. If you’re sure the file exists and want to overwrite its contents completely, then the "Replace" operation is the way to go. Our example program uses the "Replace or Create" operation, indicating that it will either create a new file if none exists or replace the existing file's contents.
Moreover, the "Open File" function allows you to set file access permissions like read-only, write-only, or read-write. For files that don’t require modifications, setting the access to read-only is a good practice to prevent any unintended changes.
This function produces a file handle, representing the targeted file. This handle is crucial for subsequent read, write, or close operations on the file.
The "Write Binary File" function in the program takes the data provided to its "Data" parameter and stores it in the file. Although the "Data" parameter defaults to a variant type, it can accept nearly all data types, enabling any data to be stored in binary format. In our example, the program sequentially writes 10 integers from 0 to 9. Another parameter, "Byte Order", allows you to specify the sequence for storing each byte of data. For instance, an I32 integer comprises 4 bytes. The key question is: should these bytes be ordered with the high-order byte first or last? Most modern CPUs process data using "Little Endian" order, where higher-order data is stored in higher memory addresses. In contrast, many network protocols employ "Big Endian", placing higher-order data in lower memory addresses. Both settings are equally viable; the crucial factor is maintaining consistency in the byte order during both reading and writing.
Finally, it’s imperative to close the file after storing data. Typically, file write functions don’t write data directly to the hard disk; they first place it in a cache. Closing the file ensures that all cached data is successfully written to the disk.
We can attempt to view the data written to the file using a text editor, such as Notepad. I tried displaying the contents of the recently created test.data file directly in the command line terminal, but only encountered a series of unintelligible characters:
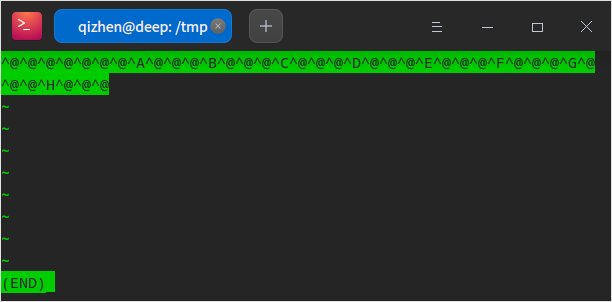
To access the data stored in the file, the only way is to write a new program to read the data out. The process of reading from a binary file closely mirrors that of writing to it:
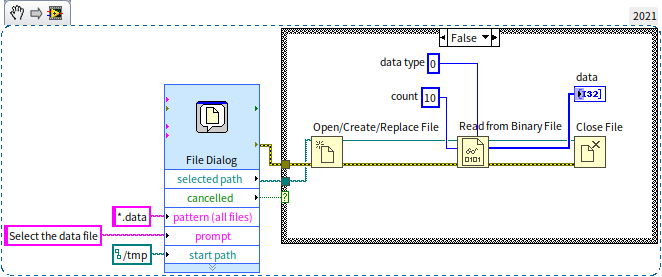
In this instance, we utilized a "File Dialog" Express VI to choose the target file. Express VIs differ from regular VIs in that they often have configurable parameters in addition to their input and output options. When you drag the "File Dialog" onto the program’s block diagram or double-click on this Express VI, a configuration dialog box appears:
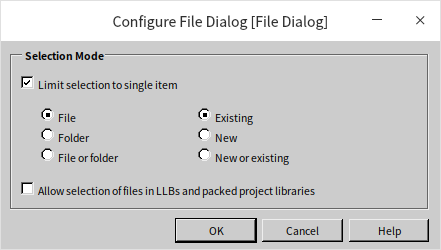
In the "Configure File Dialog", we opted for a single, pre-existing file. Besides these fundamental settings, we needed to specify additional details like the file extension ".data", an initial path "/tmp", and a prompt on the file selection dialog: "Select the data file". After configuring these parameters and executing the program, a file selection dialog is displayed:
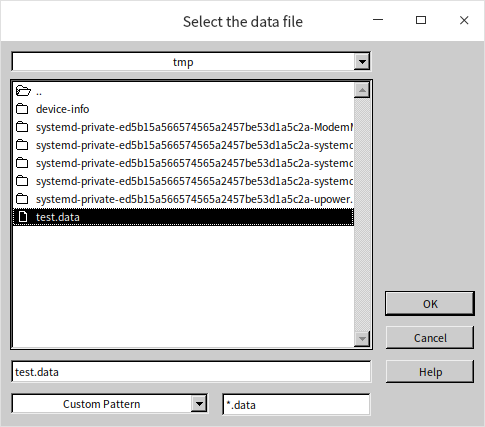
On this dialog, you select the desired file and press the OK button. The chosen file's path is then outputted from the "File Dialog" VI’s "Selected Path" parameter. If the user hits the "Cancel" button in this dialog, the program should skip the subsequent file reading steps to prevent errors. Therefore, our example program checks the "Cancel" output of the "File Dialog" VI; if it's activated, no further action is taken.
The "Read Binary File" function needs to be configured to read data of a specific type. Binary files don't inherently include data type information, so the type specified for reading must align with that used during the file's creation. While reading data, one could use a loop akin to that in the writing process. However, "Read Binary File" allows for direct specification of the quantity of data to be read. Setting this number to 10, for example, prompts the function to read 10 data items in one go. Setting it to -1 will make the function read all subsequent data in one operation.
Although the demonstration program only saved 10 integers of the same type, it's entirely feasible to store various data types in the same file. You could, for instance, start with two integers, follow with three Boolean values, and conclude with a cluster-type data entry. As long as the types and sequence of the data read match those at the time of writing, the correct data can be retrieved.
Here’s a thought-provoking question: In the earlier binary file writing example, we wrote 10 integers consecutively. What if we altered the program to write an array of 10 integers in one action? Assuming the integer values themselves are identical, would the data written to the binary file by these two methods be the same?
Reading and Writing Text Files
LabVIEW's handling of text files is very similar to its approach with binary files, offering "Write Text File" and "Read Text File" functions. The "Write Text File" function, for instance, allows you to write strings into a file by directly transferring the string's content. Consider the following program as an example:

This sample program begins by using the "Generate Temporary File Path" VI to create a path for a temporary file. It's crucial to understand that this process only generates a path; the file corresponding to this path does not exist yet. This feature is particularly useful for testing purposes, where data parameters are often stored temporarily and then discarded later. The "Generate Temporary File Path" VI is convenient as it automatically generates names for these temporary files and places them in the system's temp folder. This folder is regularly cleaned by the operating system, alleviating concerns about the temporary files taking up too much space.
When we examine the file that was created, it contains only legible text characters:
In the latter part of the example program, the data is read back from the file. As there is no closing and reopening of the file involved, the "Set File Position" function is used to reset the file's current position to the beginning before reading it. Each read or write operation moves the file's current position forward by the length of the data processed. Therefore, if you need to read the data again after writing it, resetting the file's current position to the start is necessary. For larger files where only a specific portion is needed, you can similarly use the "Set File Position" function to navigate to the required section before reading the data.
Text is often organized into lines, so the "Write Text File" function supports inputs not only in string data type but also as string arrays, with each array element being written as a separate line in the file. Conversely, the "Read Text File" function can output the text as a string array. By right-clicking on the "Read Text File" function and selecting "Read Lines", the function will default to reading the file line by line, one line at a time. If you set the read count to -1, the function will read all the lines in the file:
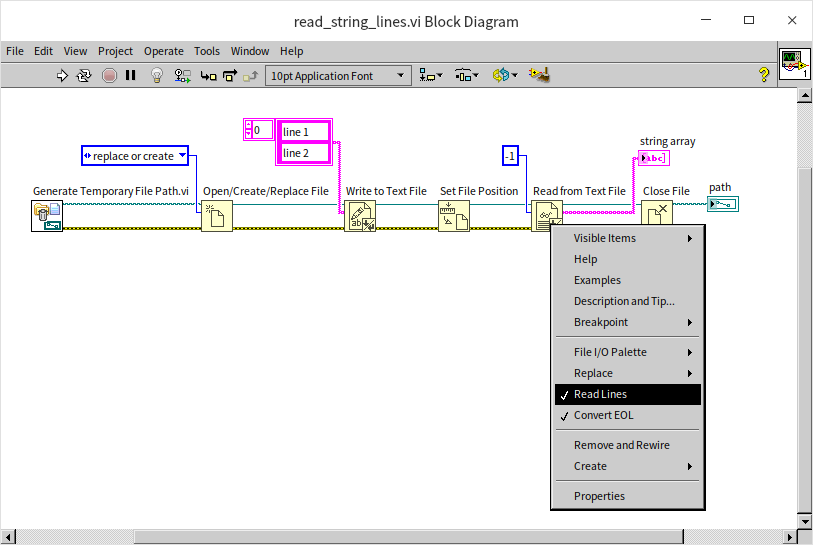
If you have already read data in a string format, you can use LabVIEW’s string processing function (Delimited String to 1D String Array.vi) to convert it into a string array, separated by lines. The program shown below performs equivalently to the one in the previous image:

One notable feature in both the "Write Text File" and "Read Text File" functions is an option in their context menus called "Convert EOL" (Convert End Of Line), relevant primarily on Windows systems. In Windows, text files typically end each line with two characters: "Carriage Return + Line Feed (CR+LF)", represented as "\r\n". In contrast, Unix and Linux systems use "Line Feed LF (\n)", and Apple computers use "Carriage Return CR (\r)". Most text files available online, including source codes for various programming languages, tend to follow the Linux-style line breaks. When "Convert EOL" is enabled on Windows, the "Write Text File" and "Read Text File" functions automatically adjust the line separator in the source document to "\r\n".
Interchangeable Formats: Binary and Text Files
Given that a text file is essentially a specialized form of a binary file, one might wonder if text files can be directly manipulated using binary file functions. For instance, can you create a text file simply by passing string data to the "Write Binary File" function? Let's explore this idea with the following program:

In this program, the "Write Binary File" function is used to write the string "abcdef" into a temporary file. When this file is opened with a text editor, "abcdef" appears as expected. However, preceding these characters, there’s some unintelligible text:
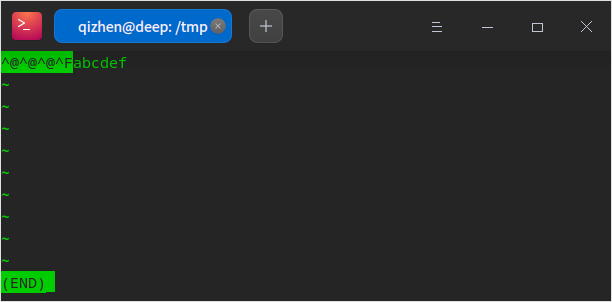
To decipher this gibberish, the example program reads back all the file's data in U8 integer format after saving the string. U8 is ideal for this purpose as it occupies exactly one byte, allowing for the sequential reading and display of each byte's data in the file. The outcome is as follows:
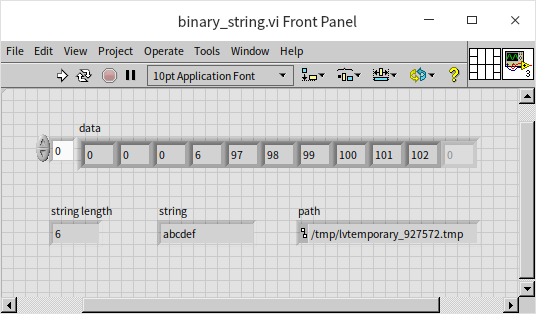
It turns out that the "Write Binary File" function, when saving string data, doesn't just write the string's content. It also inserts a U32 type integer before the string, indicating its length. This step is crucial for the "Read Binary File" function to know how many bytes to read back. To create a text file that contains only the string's content, we could first convert the string into a U8 array, then write each array element to the file, thereby generating a proper text file:

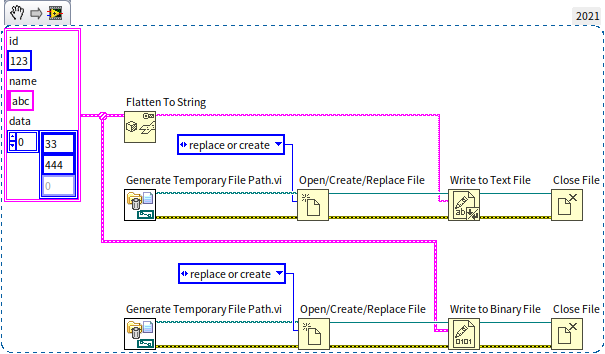
Similarly, we can use the "Write Text File" function to generate a binary file. In the section about "Strings", we discussed the concept of "flattening", which is what happens when data is written to a binary file. Hence, if we initially flatten a piece of data into a string and then use the "Write Text File" function to store it, the result is effectively the same as directly using the "Write Binary File" function. For instance, the two data-writing methods shown in the image below are functionally equivalent:
Commonly Used File Formats in LabVIEW
LabVIEW allows users to freely organize data within basic binary and text files. While this offers great flexibility, it's not always conducive to sharing or exchanging data, as others might not be familiar with your custom file format. This lack of standardization can make reading and writing such files less convenient. Thankfully, there are numerous predefined file formats, each with a specific internal data organization structure. Many of these file format standards are publicly accessible, ensuring that a file created according to a particular standard can be correctly interpreted by others.
On LabVIEW’s "File I/O" function palette, you can find various supported file types, such as spreadsheet-format files, measurement files, configuration files, TDM/TDMS files, XML files, and waveform files, among others. The process of working with these file types is similar to that with basic binary and text files, encompassing fundamental operations like opening, reading, writing, and closing. Some file types streamline the process by combining opening and closing operations within the read and write functions. Thus, the crucial consideration is choosing the most suitable file type for your specific project needs.
Spreadsheet Files
Spreadsheet files, which are text-based, are designed for handling two-dimensional array data. This format is quite prevalent; for example, a class's exam scores can be organized in a tabular format, with each cell holding a score, each row representing a student, and each column a subject. There are two popular formats for spreadsheet files, based on their delimiters: CSV (Comma-Separated Values) files, using a comma (",") to separate each data point within a row and usually carrying a ".csv" extension, and TSV (Tab-Separated Values) files, using a tab ("\t") as the separator and typically having a ".tsv" extension. While users can customize delimiters and file extensions, adhering to these common standards ensures better compatibility and easier recognition by various software.
Microsoft Excel is the most widely used application for managing spreadsheet data. Along with similar programs like Google Sheets and WPS Office, Excel can process both .csv and .tsv files. Spreadsheet files are thus an excellent medium for sharing data between such applications and LabVIEW.
Handling spreadsheet files in LabVIEW is quite straightforward. Below is an example illustrating how to write data to a spreadsheet file:
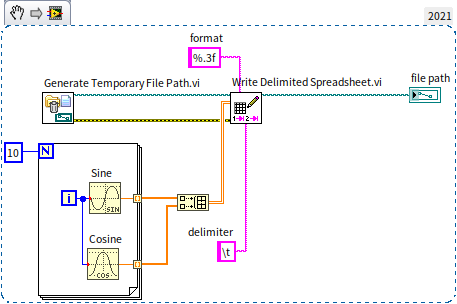
Regardless of the types of elements in the input array, they are ultimately stored in the file in a text format. Therefore, you might need to configure the data formatting during the writing process to ensure the file's data is easily readable. For guidelines on how to format strings, refer to the section on String Data.
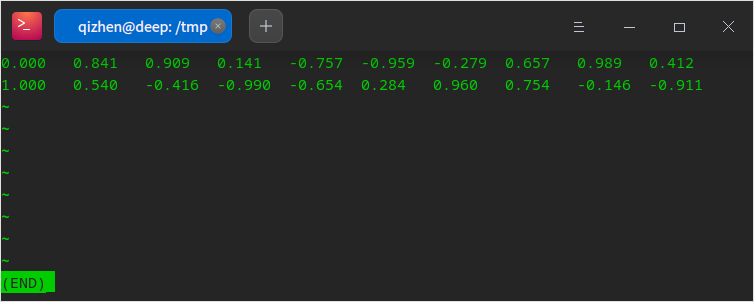
The data written by the program looks like this:
Below is an example of an open-source data file found online, named weight_height.csv:
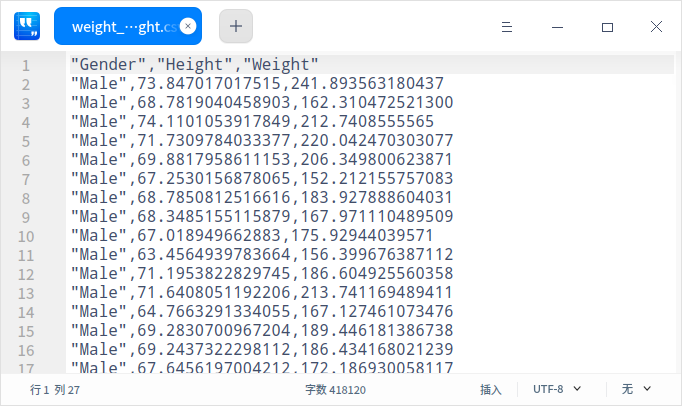
It's clear that the file contains three columns, representing gender, height, and weight. The program illustrated below can extract and display this data:
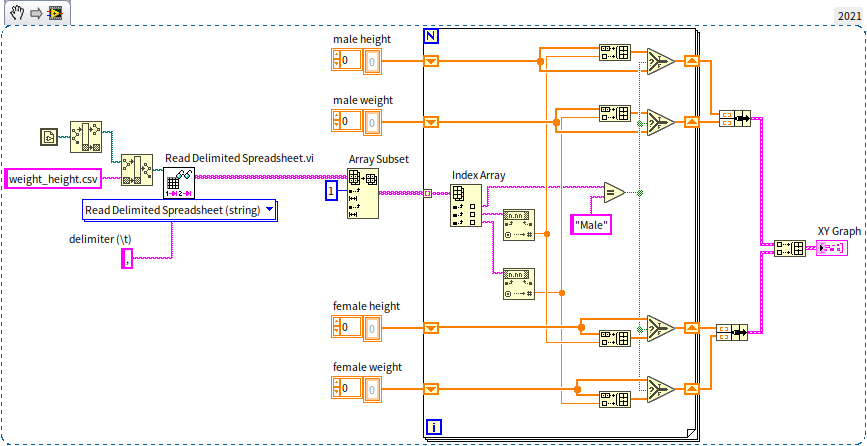
The "Read Spreadsheet File" is a polymorphic VI. By clicking on the data type selection menu beneath it, you can see it is capable of reading three data types: Double-precision Floating-point (DBL), 64-bit Integer (I64), and String. The file we are reading includes both string data (first column: gender) and real number data (second and third columns: height and weight). If we opt to read the file as real number data, the output will be a two-dimensional real number array, but it will overlook all string data in the source file. Therefore, we must read all the data as strings, then individually convert height and weight to real numbers.
This CSV file uses commas as its delimiters, so it's important to set the delimiter to "," during the read process; otherwise, the VI will default to using tab characters for data separation.
Many spreadsheet files use the first row for column names rather than actual data. After reading the file, you just need to keep the data you require.
The program's output is demonstrated in the following image:
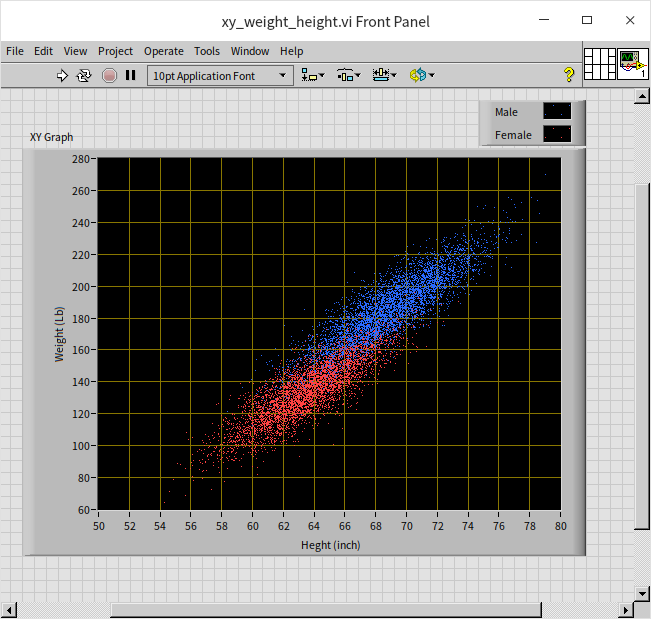
For more information on displaying data, refer to the section on Graphical Data Display.
Configuration Files
Configuration files, also known as INI files, typically use the .ini extension. "INI" stands for "Initialization". These files are specifically designed to save a program's configuration information, such as the size and position of the program interface, files that have been opened previously, and more. This recorded data allows a program to return to its state at the time of its last closure, hence the origin of the name "INI file". In Windows, LabVIEW itself includes an INI file - LabVIEW.ini, which is found in the same folder as the LabVIEW.exe file. INI files are text-based, so you can open LabVIEW.ini with a text editor to explore its contents.
For instance, you might encounter entries like these:
[LabVIEW]
IconEditor.TextFont="LabVIEW Application"
IconEditor.TextSize=00000009
These lines are just a snippet from the LabVIEW.ini file, indicating the font and size used in LabVIEW's Icon Editor. When users adjust these settings in the Icon Editor, the changes are logged in this INI file, ensuring that LabVIEW remembers the adjustments even after a restart.
In the example provided, the brackets denote the beginning of a section, and an INI file can include multiple such sections. The text within the brackets names the section, and each section in a file must have a unique name. The lines beneath the brackets, extending up to the next set of brackets, form the content of that section. Every line here should be a key-value pair: the setting's name on the left of the equals sign and its value on the right. In each section, keys must be unique, although different sections can have keys with the same names. Values can be either numerical or strings. Occasionally, lines beginning with a semicolon ";" appear. This symbol denotes a comment in INI files, indicating that such lines serve no functional purpose.
Below is an example of a typical INI file:
[section_one]
key1=1
key2="some string"

[section_2]
key1=2.5
; The following line is inactive
;key_five=7.99
The process of working with INI files involves opening the file, conducting read/write operations, and then closing it. This procedure closely resembles handling text and binary files. The VIs for INI file operations are polymorphic VIs and support six fundamental data types: Boolean, Double-precision (DBL), 32-bit Integer (I32), Path, String, and 32-bit Unsigned Integer (U32). Regardless of the data type, you need to specify the section name and key for both reading and writing. When writing data, if the relevant section or key doesn't exist, the file will create a new section and key accordingly; when reading, if the section or key is absent, a user-defined default value is returned.
The following image showcases a program designed for writing to an INI file:

The program initially obtains the path of the current VI, then discards the file name, retaining only the directory path where the program is located. Next, it creates a new path pointing to the test.ini file located in the same directory as the current VI. The "Open Configuration Data" VI is then used to open this INI file. Subsequently, the program uses the "Write Key" VI to input various data types. The program also employs the "Delete Key" and "Delete Section" VIs, removing some of the recently written data. The deleted sections and key values will not be included in the file. The process is concluded with the "Close Configuration Data" VI, which closes the file. Note that the file is actually written to disk only upon closing, meaning that if you only use "Write Key" without closing the file, the disk content will remain unchanged.
If the INI file initially contains data, the "Write Key" function will overwrite data within the same section and key name. However, if a key is neither rewritten nor deleted, its content will stay the same.
When writing string data, there's a setting in the VI: "write raw string?" Generally, the default setting is adequate. With this setting, the write VI automatically encodes unprintable characters, such as carriage returns, into a readable format. Only in rare cases, like when the INI file is to be used by external programs outside of LabVIEW, you might need to avoid encoding strings.
Running the above program produces an INI file like this:
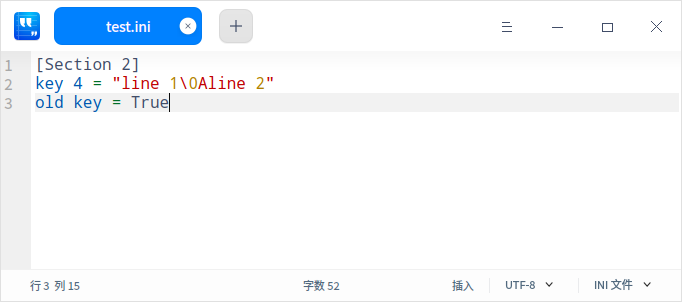
Here, you can observe that the carriage return in the string data for key 4 is encoded as "\0A". The file also retains some pre-existing sections and key values that have not been modified.
Complex data types, such as arrays or clusters, cannot be directly passed to the "Write Key" VI. However, there is a way to store such data in INI files. For instance, the key "RecentFiles.pathList" in the LabVIEW.ini file records the paths of the last ten VIs opened by LabVIEW. Originally an array of paths, LabVIEW converts this into a string for the INI file, using a colon ":" to separate each path. When writing your programs, you can follow LabVIEW.ini's approach by converting complex data into custom-formatted strings. Refer to the "Two Interchangeable Formats" section and the "flattening" function described in the "String Data" section to transform data into a string before saving it in the INI file.
Reading from INI files is akin to writing. The following program reads the LabVIEW.ini file:

Firstly, the program uses a file dialog to select a file. On Linux systems, the extension for configuration files is .conf. The program then opens the selected file and uses the "Get Key Names" VI to list all key names under the "LabVIEW" section. It reads the value of each key sequentially. Like the "Write Key" VI, "Read Key" is a polymorphic VI that supports the same data types. However, since we read the data in a loop without distinguishing their data types, we used strings to read all the data. As INI files are text-based, any content can be read as a string. The program output displays part of my LabVIEW environment settings:
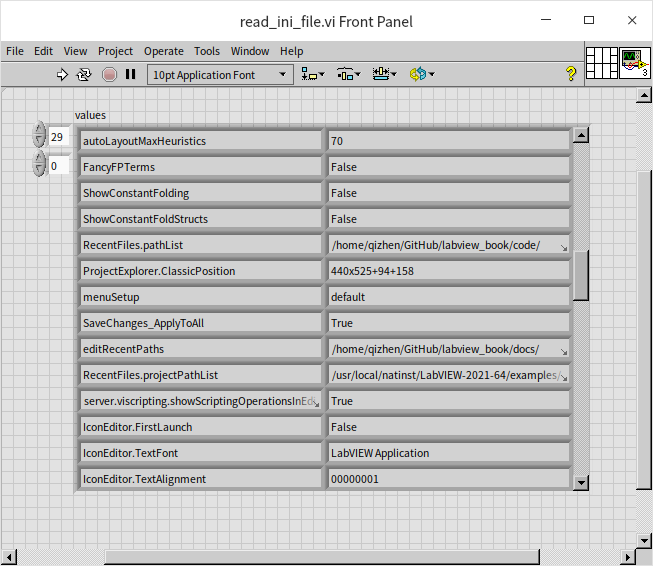
The efficiency of reading and writing configuration files is relatively low. Typically, an application’s configuration information isn’t too extensive, so using configuration files for storing such data isn’t problematic. However, for larger data volumes, such as those collected by a program or results of data analysis, configuration files are not an ideal storage solution.
LabVIEW Measurement Files
LabVIEW Measurement Files are not confined to a single file type; they are, in fact, a comprehensive collection of Express VIs. For those involved in developing data acquisition or testing programs, the application of Express VIs for file operations can be incredibly advantageous. Consider, for instance, a scenario in which an engineer is working on a project that involves collecting temperature and humidity data from various sensors. Traditionally, handling the data collection, processing, and storage of this information might require extensive coding. However, with LabVIEW Measurement Files, this process is streamlined.
TDM and TDMS files
Technical Data Management (TDM) and TDM Streaming (TDMS) are two closely related data formats that play a crucial role in modern data acquisition and management systems, particularly in environments where precise and efficient data handling is essential. Both formats are predominantly used for storing large volumes of data collected from various hardware devices, making them especially relevant in fields such as engineering, scientific research, and industrial automation.
TDM is primarily designed for Windows operating systems and is adept at handling data in a structured and organized manner. It saves data captured by hardware devices in a binary format, typically in files with a .tdx extension. This format is optimized for speed and efficiency, ensuring that large data sets are saved quickly and with minimal storage space. Alongside the binary data, TDM also records associated information in a text format within a corresponding .tdm file. This associated information often includes metadata like channel names, user names, and other contextual details that provide clarity and relevance to the stored data.
TDMS, on the other hand, is an extension of the TDM format, hence the name TDM Streaming. It represents an evolution in data storage, combining both binary data and textual information into a single, streamlined .tdms file. This integration simplifies file management and reduces the complexities associated with handling multiple files. The TDMS format is particularly beneficial for applications that involve streaming large volumes of data, as it efficiently handles the continuous flow of information in real-time scenarios.
-
Industrial Monitoring Systems: In an industrial setting, where machinery and equipment are continuously monitored, the TDMS format can be utilized for recording data from various sensors. For instance, a manufacturing plant might use sensors to monitor equipment temperature, vibration, and pressure. The TDMS format can store this data seamlessly, along with timestamps and machine identifiers, in a single file for each monitoring session.
-
Scientific Research: Researchers conducting experiments that generate large amounts of data, such as in particle physics or astronomy, can leverage the TDM format. For example, in a particle accelerator experiment, the TDM format can be used to record the binary data representing particle collision events, while the associated .tdm file captures the experimental setup details, operator notes, and calibration parameters.
-
Automotive Testing: In automotive testing scenarios, where various vehicle parameters are recorded during test drives, TDMS files offer an efficient way to store real-time data from vehicle sensors, such as speed, acceleration, and engine performance metrics. The single-file format makes it easier to transfer and analyze the data post-test.
The primary advantage of using TDM and TDMS formats lies in their ability to efficiently handle large sets of complex data. They provide a structured approach to data storage, ensuring that both the data and its contextual metadata are preserved in a coherent and accessible manner. This structure is particularly beneficial for applications requiring post-processing and analysis of data, as it simplifies data retrieval and interpretation.
Additionally, the integration of binary and textual data in TDMS files offers a streamlined approach to data management, reducing the need for handling multiple files and the potential for data misalignment. This integration is particularly valuable in applications involving real-time data streaming or long-term data logging.
In conclusion, both TDM and TDMS formats offer robust solutions for managing large volumes of data in various technical and scientific applications. Their design caters to the needs of high-precision data acquisition, ensuring that both data integrity and efficiency are maintained. Whether it's for industrial monitoring, scientific research, or automotive testing, TDM and TDMS stand out as reliable choices for technical data management, providing a structured and efficient approach to data handling in our increasingly data-driven world.
XML and JSON Files
XML (eXtensible Markup Language) and JSON (JavaScript Object Notation) are two of the most widely used text-based file formats for storing and exchanging data. Both formats are particularly valuable in LabVIEW, a system design platform and development environment used widely in engineering and scientific applications. They are ideal for handling data that is structurally complex, providing a human-readable format and the ability to incorporate tags or keys for descriptive information about the data.
XML
XML is a flexible, structured language that is commonly used for data representation and configuration files. It uses a tag-based structure with a hierarchical arrangement that can easily represent complex data relationships.
-
Creating and Writing XML: LabVIEW offers various functions for creating XML documents. You can start by defining the root element and then add child elements, attributes, and text content to build the XML structure. For instance, if you are working on a project that involves recording sensor data, you can create an XML file where each sensor's data is enclosed in separate tags, along with attributes like timestamp, sensor type, and units.
-
Reading XML: LabVIEW provides functions to parse XML files. You can read the XML file into a LabVIEW application, navigate through its structure, and extract data from specific elements or attributes. This functionality is useful, for example, in configuration files where parameters for a test setup are defined in XML format.
-
Example Use Case: A typical use of XML in LabVIEW could be in a data logging application where you need to log data from various sensors at different intervals. The XML file can store data with tags representing each sensor, making it easy to identify and process the data.
JSON
JSON is a lightweight format, easy for humans to read and write and easy for machines to parse and generate. It uses a key-value pair structure, which is very effective for representing complex, hierarchical data structures.
-
Creating and Writing JSON: LabVIEW's JSON functions allow you to create JSON objects or arrays. You can add key-value pairs where the keys are strings and the values can be numbers, strings, arrays, or even nested JSON objects. For instance, in an application monitoring environmental conditions, you can store temperature, humidity, and air quality levels in a JSON file with key-value pairs for easy data retrieval and analysis.
-
Reading JSON: LabVIEW includes functions to read JSON files and parse their content. This allows you to extract values associated with specific keys, making it easy to process and analyze the data.
-
Example Use Case: An example of JSON usage in LabVIEW could be in a user interface application where the layout and user settings are stored in a JSON file. The application can read the JSON file at startup to configure the user interface according to the user’s preferences.
Both XML and JSON file formats offer great flexibility and efficiency in data handling within LabVIEW. They allow for the structuring of complex data in a way that is both machine and human-readable, enhancing the ease of data manipulation and interpretation. Whether it’s for configuration, data logging, or user interface settings, XML and JSON are valuable tools in the LabVIEW environment, enabling more efficient data management and application development.
Waveform Files
Waveform Files are designed to capture and store waveform data – a set of data points typically representing a signal varying over time. They are well-suited for applications where signals need to be recorded for analysis, monitoring, or post-processing. Unlike regular text files, Waveform Files are stored in a binary format. This format ensures efficient storage and quick access but also means that the data cannot be directly read in a standard text editor.
-
Data Acquisition: Suppose you are capturing an audio signal or vibration data using LabVIEW. You can use the Data Acquisition (DAQ) VIs to acquire the signal and then employ the Waveform File VIs to write this data into a Waveform File. This file will contain all the necessary information about the signal, such as the sampling rate, the start time, and the actual data values.
-
Writing Data: LabVIEW provides specific VIs for creating and writing to Waveform Files. These VIs allow you to define the file path, set file properties, and specify how the data is to be written – whether it's appended to an existing file or used to create a new file.
-
Data Retrieval: When you need to analyze or process the stored waveform data, you can use LabVIEW’s Waveform File VIs to read the data from the file. These VIs enable you to extract the waveform data along with its attributes for further analysis.
-
Visualization and Analysis: After retrieving the data from a Waveform File, you can visualize it using LabVIEW’s graphing tools or process it using signal analysis VIs to extract meaningful information.
A practical application of Waveform Files could be in an environmental monitoring system. For instance, if you’re monitoring the noise levels in a natural reserve, you can use LabVIEW to capture audio signals at regular intervals. These signals can be stored in Waveform Files, capturing the sound profile over time. Later, these files can be read back into LabVIEW to analyze changes in the noise levels, identify patterns, or detect anomalies.
The binary format of Waveform Files provides a compact and efficient way to store large sets of waveform data. It enables quick writing and reading operations, which is crucial in applications involving real-time signal processing or long-duration data logging. Moreover, the integral structure of Waveform Files, which encapsulates both the data and its metadata, ensures that the waveform is always accompanied by its contextual information, facilitating accurate analysis and interpretation.
In conclusion, Waveform Files in LabVIEW offer a robust solution for managing waveform data effectively. They are particularly beneficial in applications that require the efficient logging and retrieval of signal data. Whether it’s for scientific research, environmental monitoring, or industrial diagnostics, Waveform Files provide a practical way to handle complex signal data, ensuring that it’s stored in a format that’s both space-efficient and ready for subsequent analysis within the powerful environment of LabVIEW.
Practice Exercise
- Write to File:
- Create a new VI in LabVIEW.
- Use the 'Write to Text File' VI to write a series of numbers or a string to a text file. You can choose to write a fixed string or use the controls to input data.
- Add a file path control to specify the location and name of the text file.
- Read from File:
- Use the 'Read from Text File' VI to read the content of the file you just created.
- Display the read content on the front panel using a string indicator.
- Run the VI:
- Execute the VI to write data to the file and then read it back.
- Observe the output on the string indicator.